Create an audio recorder app using Ionic 2
Building mobile apps can be a daunting task. One of the biggest problems is that each platform has its own, specific ecosystem, which prevents you from reusing code between platforms. The Ionic 2 platform lets you build apps for multiple platforms from a single code base, using only HTML, CSS and JavaScript. Ionic 2 is built on the powerful Angular 2 framework.
In this post, we’ll build a native app using Ionic 2. To demonstrate that Ionic 2 apps are real, native mobile apps, we’ll be accessing the device’s hardware to record (and playback) audio.
Installation
The first step to start building Ionic 2 apps is to install the Ionic 2 SDK (which is still in beta):
npm install -g ionic@beta
Once this command has completed, we can use the Ionic CLI to scaffold our app:
ionic start ionic2-recorder blank --v2
With this command, the CLI will scaffold an Ionic 2 app named ionic2-recorder using the blank template:
Note that scaffolding the app can take quite a while, so this might be a good time to check out the getting started documentation.
After some waiting, the CLI will finish and our app has been scaffolded:
Running in the browser
Before we start building our app, let’s see what the scaffolded app looks like. First, we go to the directory into which our app was scaffolded:
cd ionic2-recorder
Then we ask the CLI to show a preview of our app in the browser:
ionic serve
This will result in some Gulp tasks being run:
When the Gulp tasks have completed, a browser window will open showing a preview of our app:
It may not look much, but consider this: we are previewing our app in a browser! Not on a device or simulator, but a browser! This means that you can develop apps just like you are developing a website. Let’s see how that works.
Building the app - beginning
To start building our app, open the scaffolded app’s directory in your favorite editor. Don’t be daunted by the number of files and directories, we are only interested in the app directory’s contents, which looks like this:
Interestingly, this directory contains just three types of files:
- TypeScript files: the application’s logic. Compiled to JavaScript.
- SCSS files: the application’s styling. Compiled to CSS.
- HTML files: the application’s interface. Not compiled.
Clearly, as promised, an Ionic 2 app consists of only HTML, JavaScript and CSS, like any regular website.
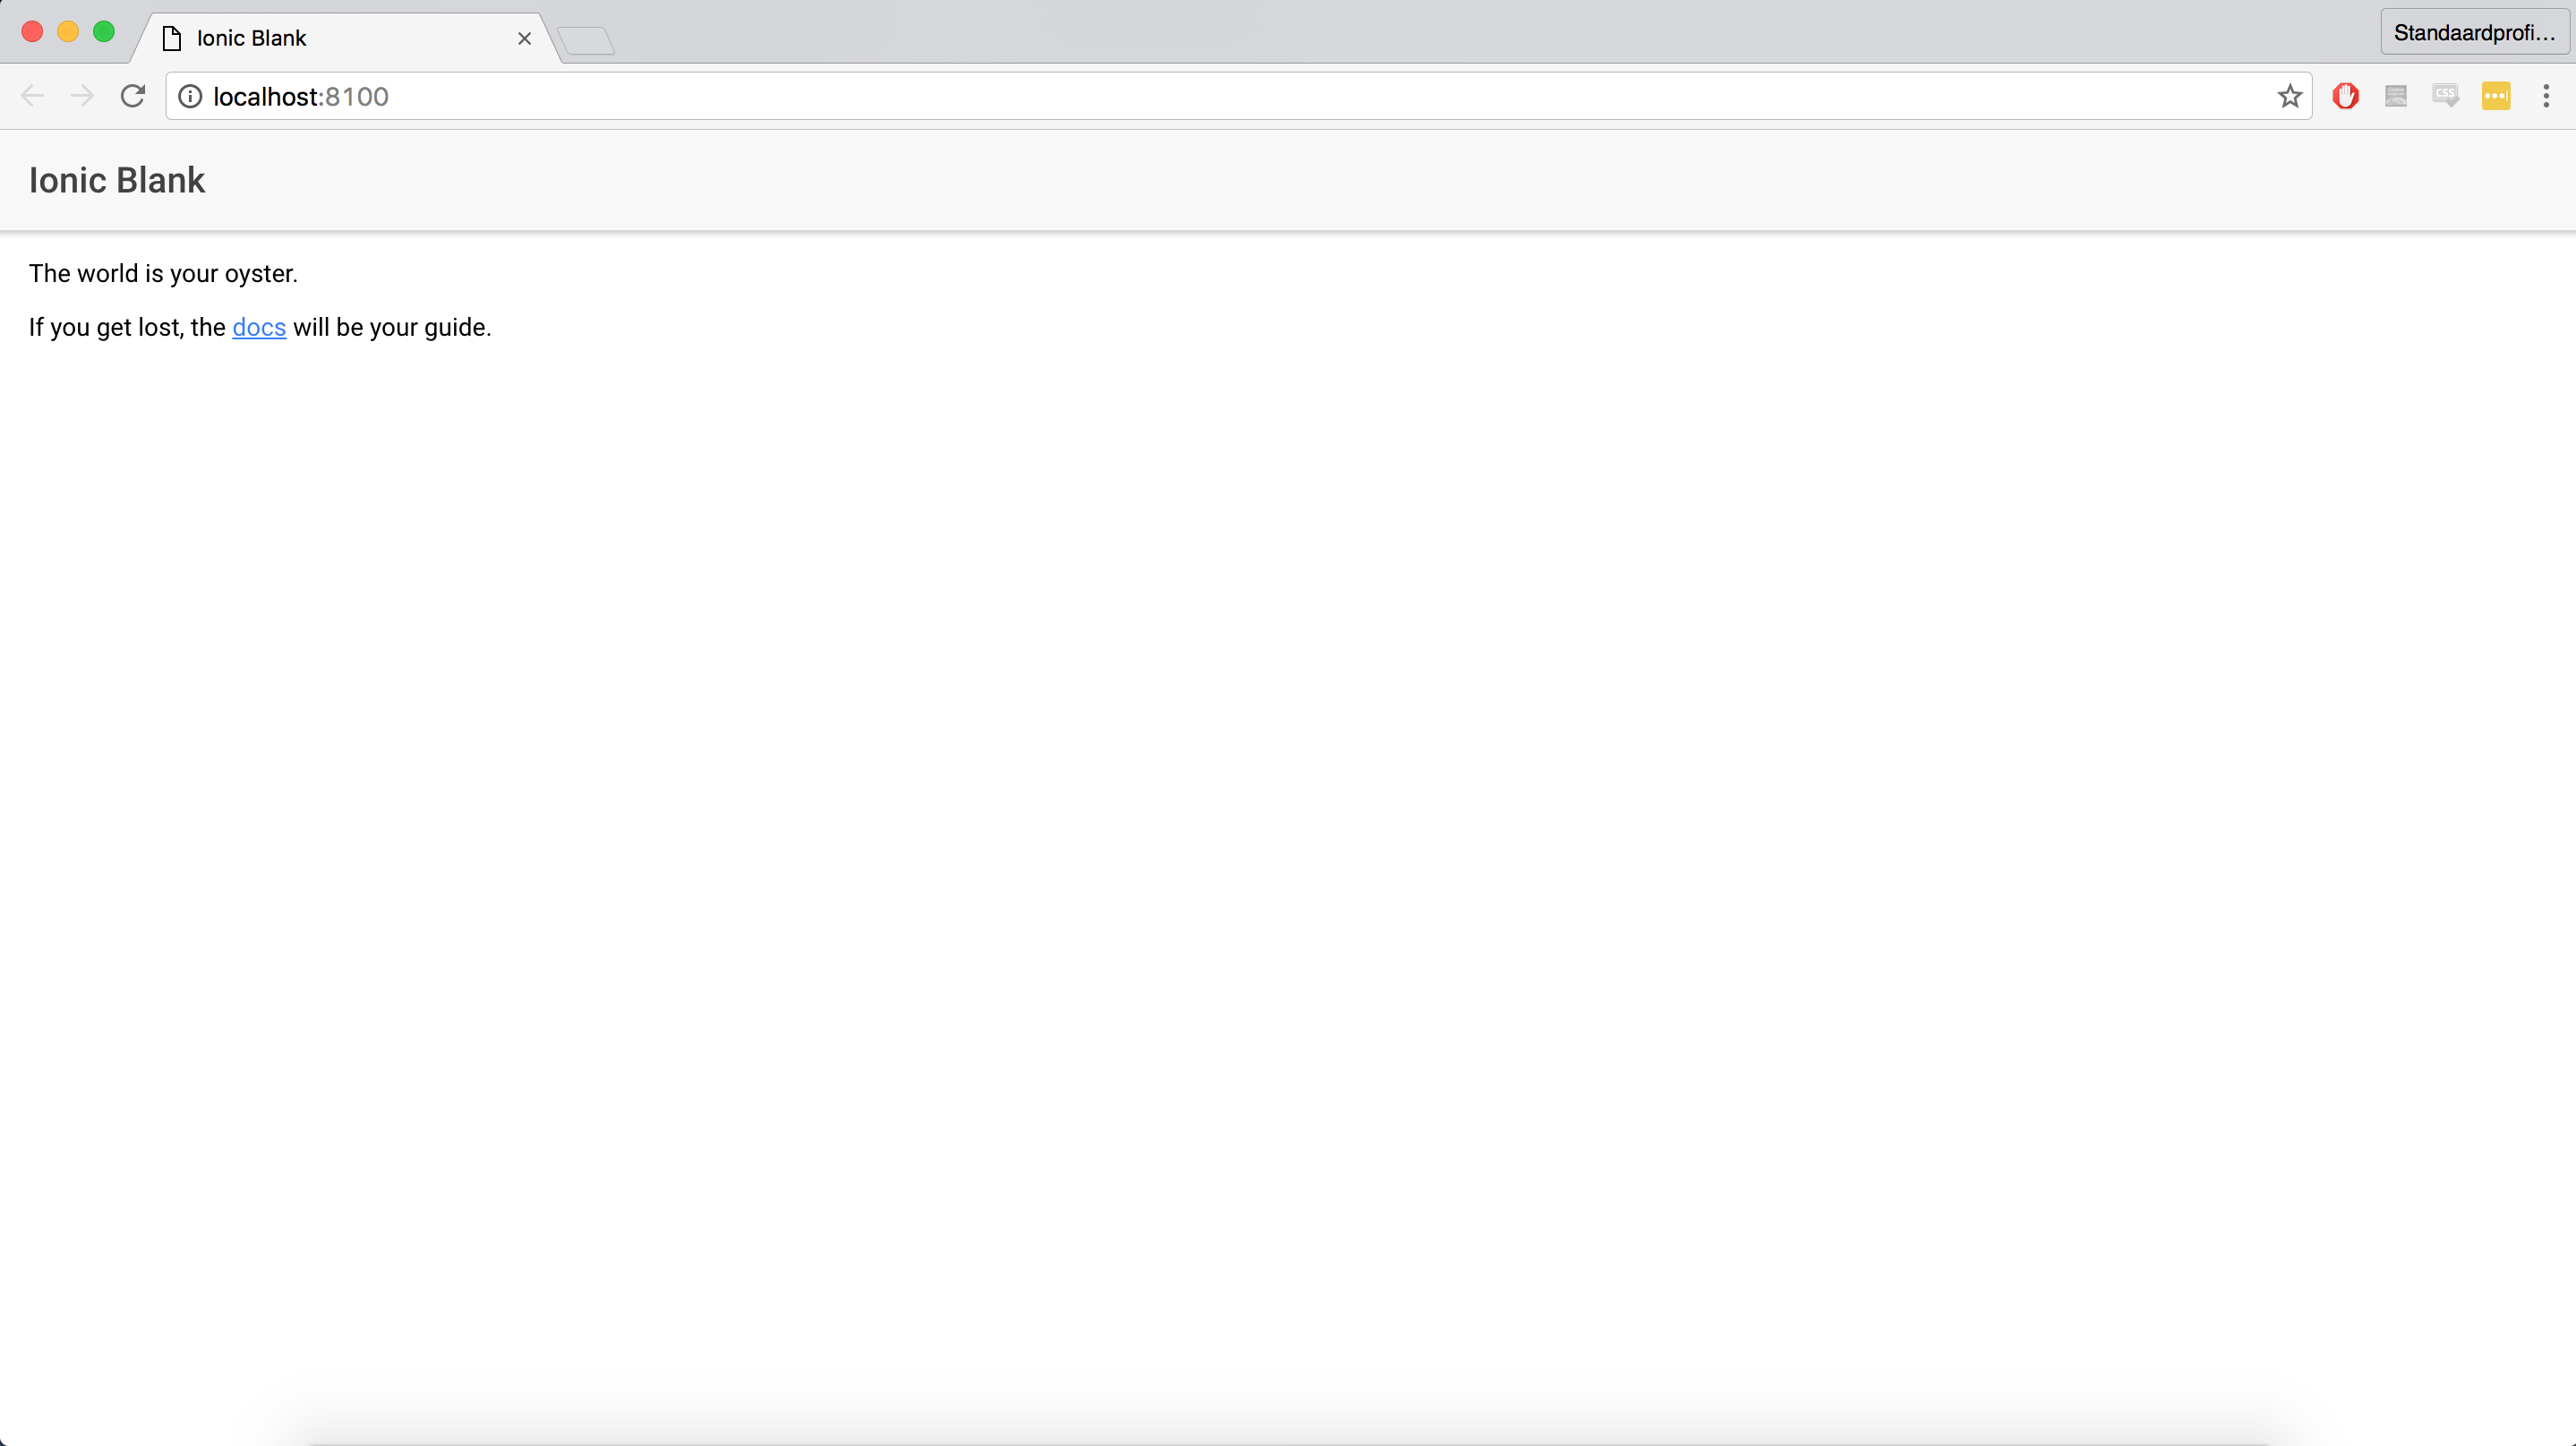
At the moment, there is only one page in our app: the home page. Let’s see what the (scaffolded) home.html file looks like:
<ion-header>
  <ion-navbar>
    <ion-title> Ionic Blank </ion-title>
  </ion-navbar>
</ion-header>

<ion-content padding>
  The world is your oyster.
  <p>
    If you get lost, the
    <a href="http://ionicframework.com/docs/v2">docs</a> will be your guide.
  </p>
</ion-content>
Although there are some regular HTML tags like the <p> and <a> tags, there are also custom tags like <ion-header> and <ion-navbar>. These tags are specific to the Ionic framework and are known as components (which is an Angular 2 concept). Using these components, you’ll be able to quickly construct an interface for your app, without having to manually create and style them yourselves.
Modifying the app
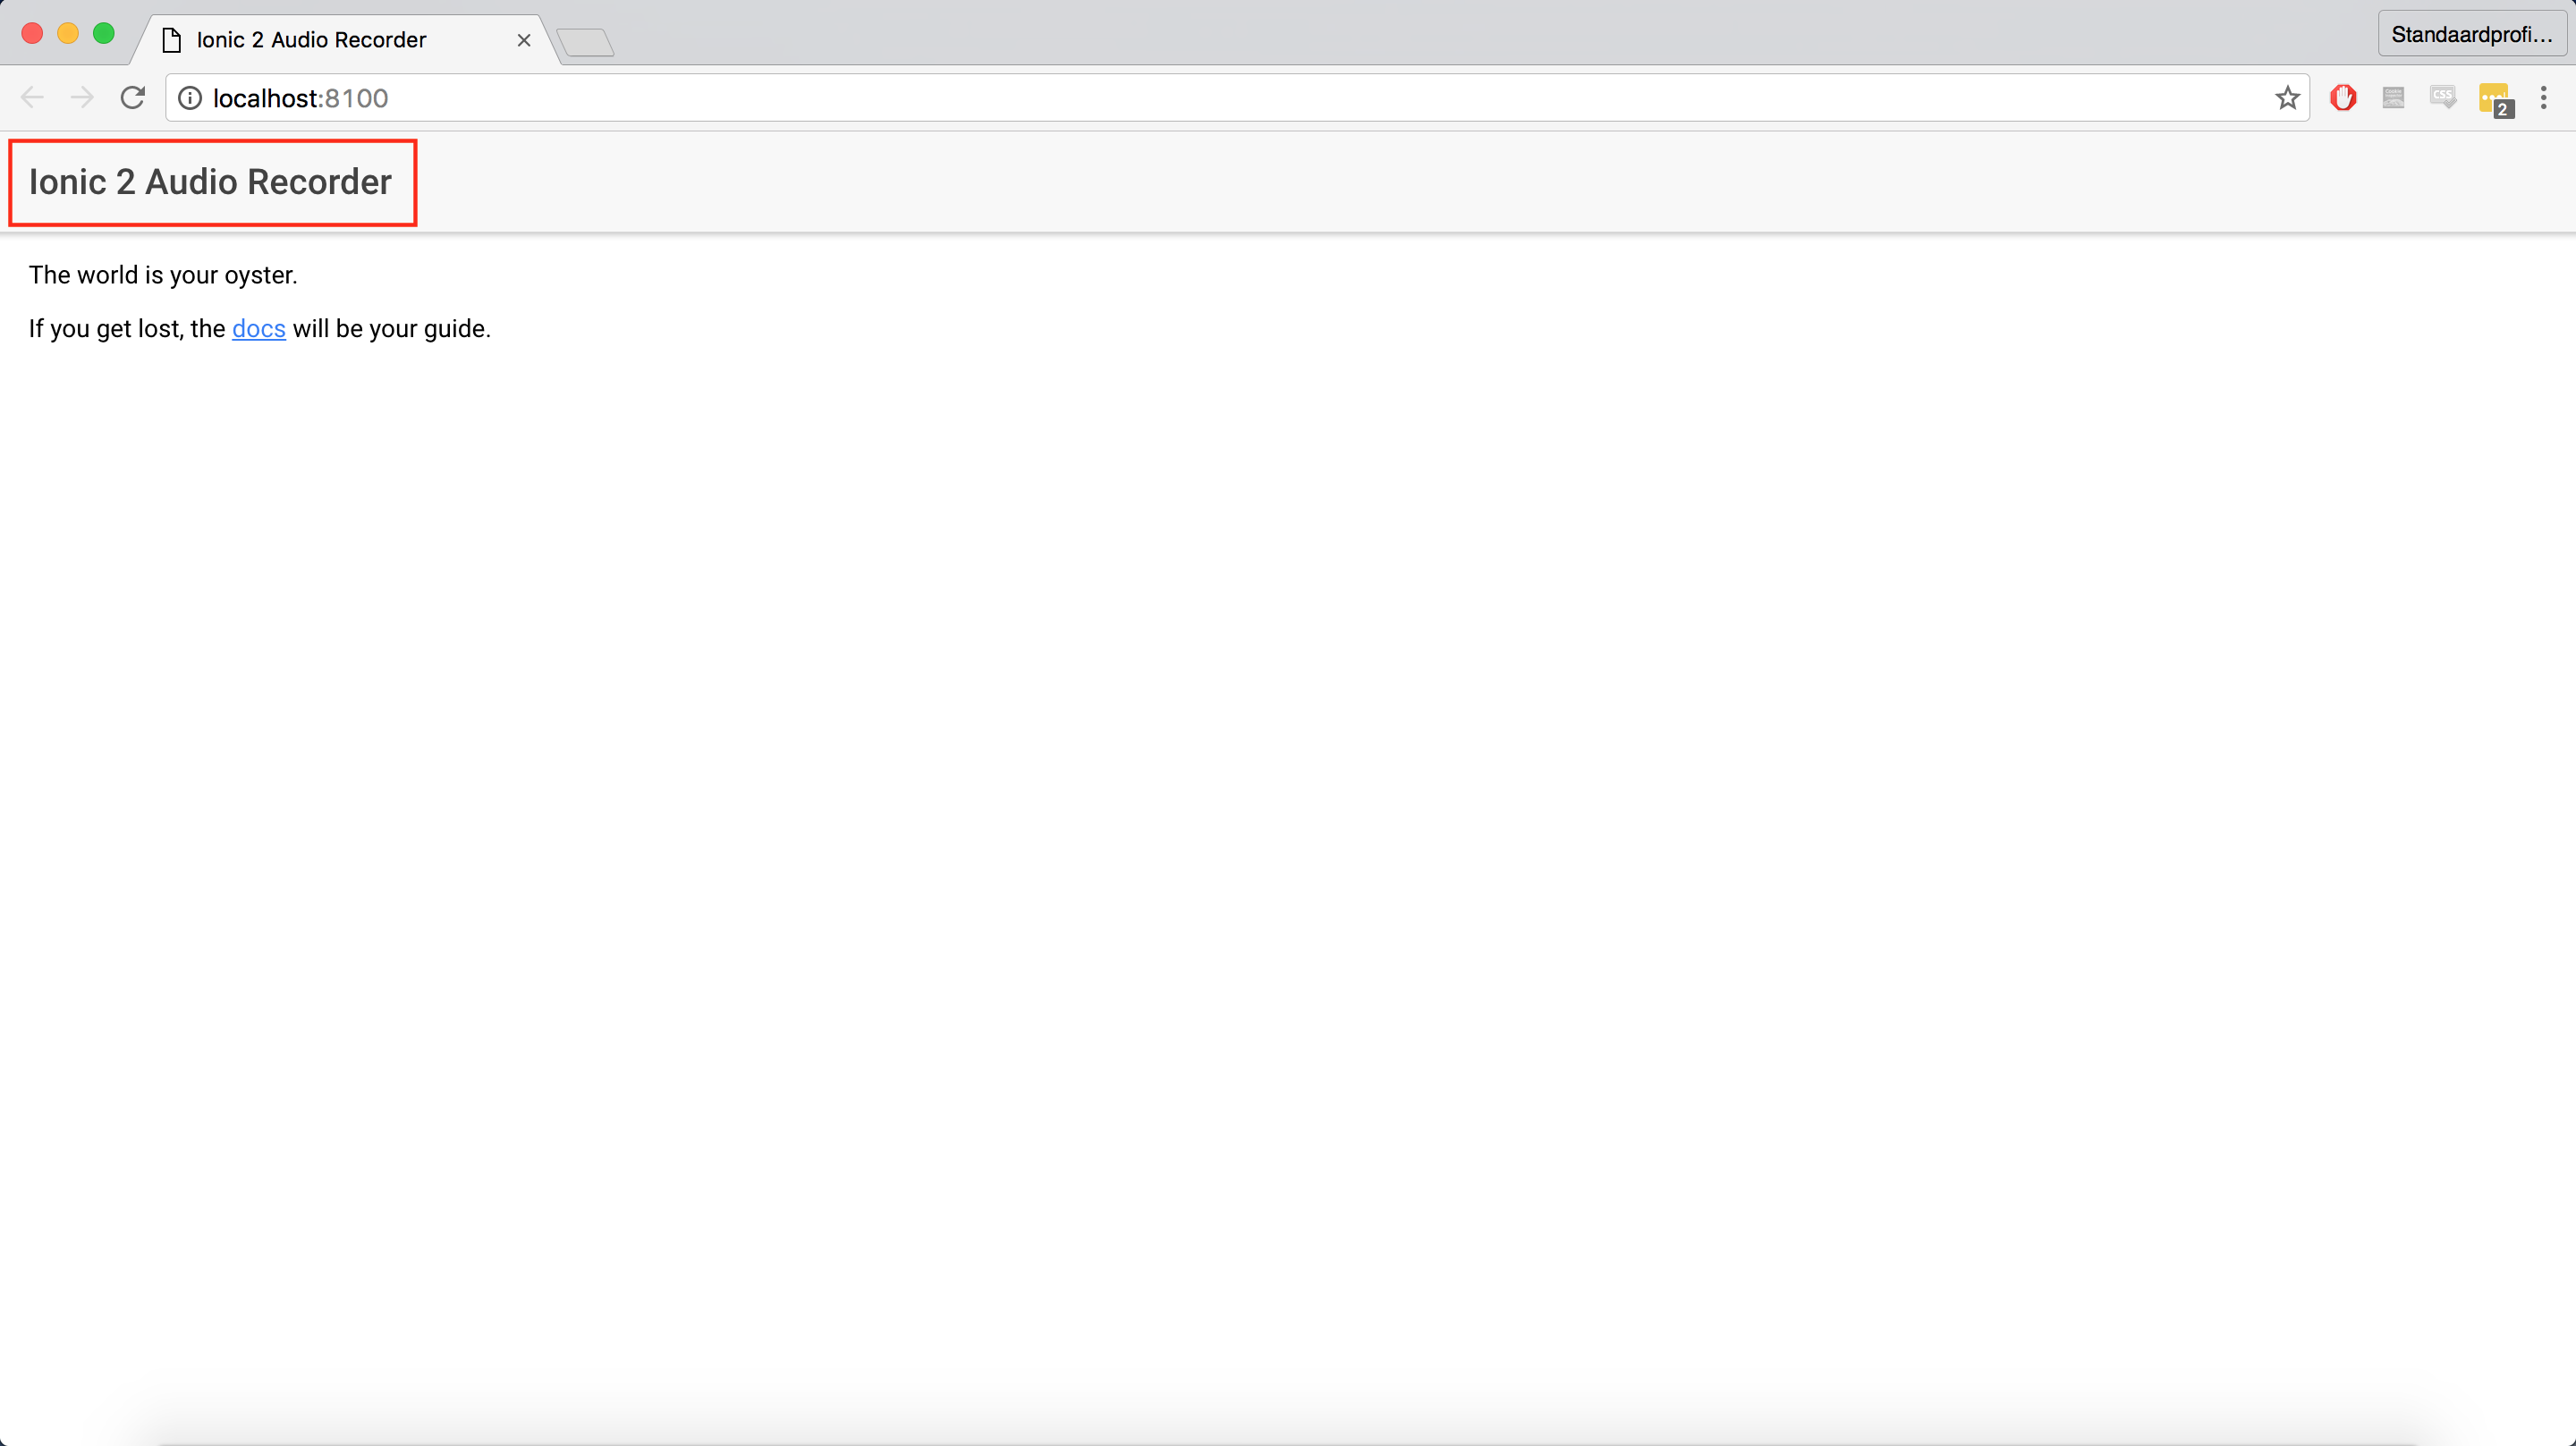
As our first modification, let’s change the contents of the <ion-title> tag:
<ion-header>
  <ion-navbar>
    <ion-title> Ionic 2 Audio Recorder </ion-title>
  </ion-navbar>
</ion-header>

<ion-content padding>
  The world is your oyster.
  <p>
    If you get lost, the
    <a href="http://ionicframework.com/docs/v2">docs</a> will be your guide.
  </p>
</ion-content>
If we save this file, the CLI will rebuild the app and automatically refresh the browser window to show our app with the modified title:
As a first step towards implementing audio recording functionality, let’s add a “Start recording” button:
<ion-header>
  <ion-navbar>
    <ion-title> Ionic 2 Audio Recorder </ion-title>
  </ion-navbar>
</ion-header>

<ion-content padding>
  <p>
    <button>Start recording</button>
  </p>
</ion-content>
Note that we just use a regular <button> tag, as there is no <ion-button> component.
The updated app looks like this:

Improved device preview
Although our browser preview looks fine, it does have fairly odd dimensions for a mobile device. If you are using Google Chrome, you can do one better. First, right-click in our app preview window and click on Inspect. This will open the Developer Tools window. If you look closely, you’ll see an icon that looks like a mobile phone in front of a tablet next to the Elements tab:
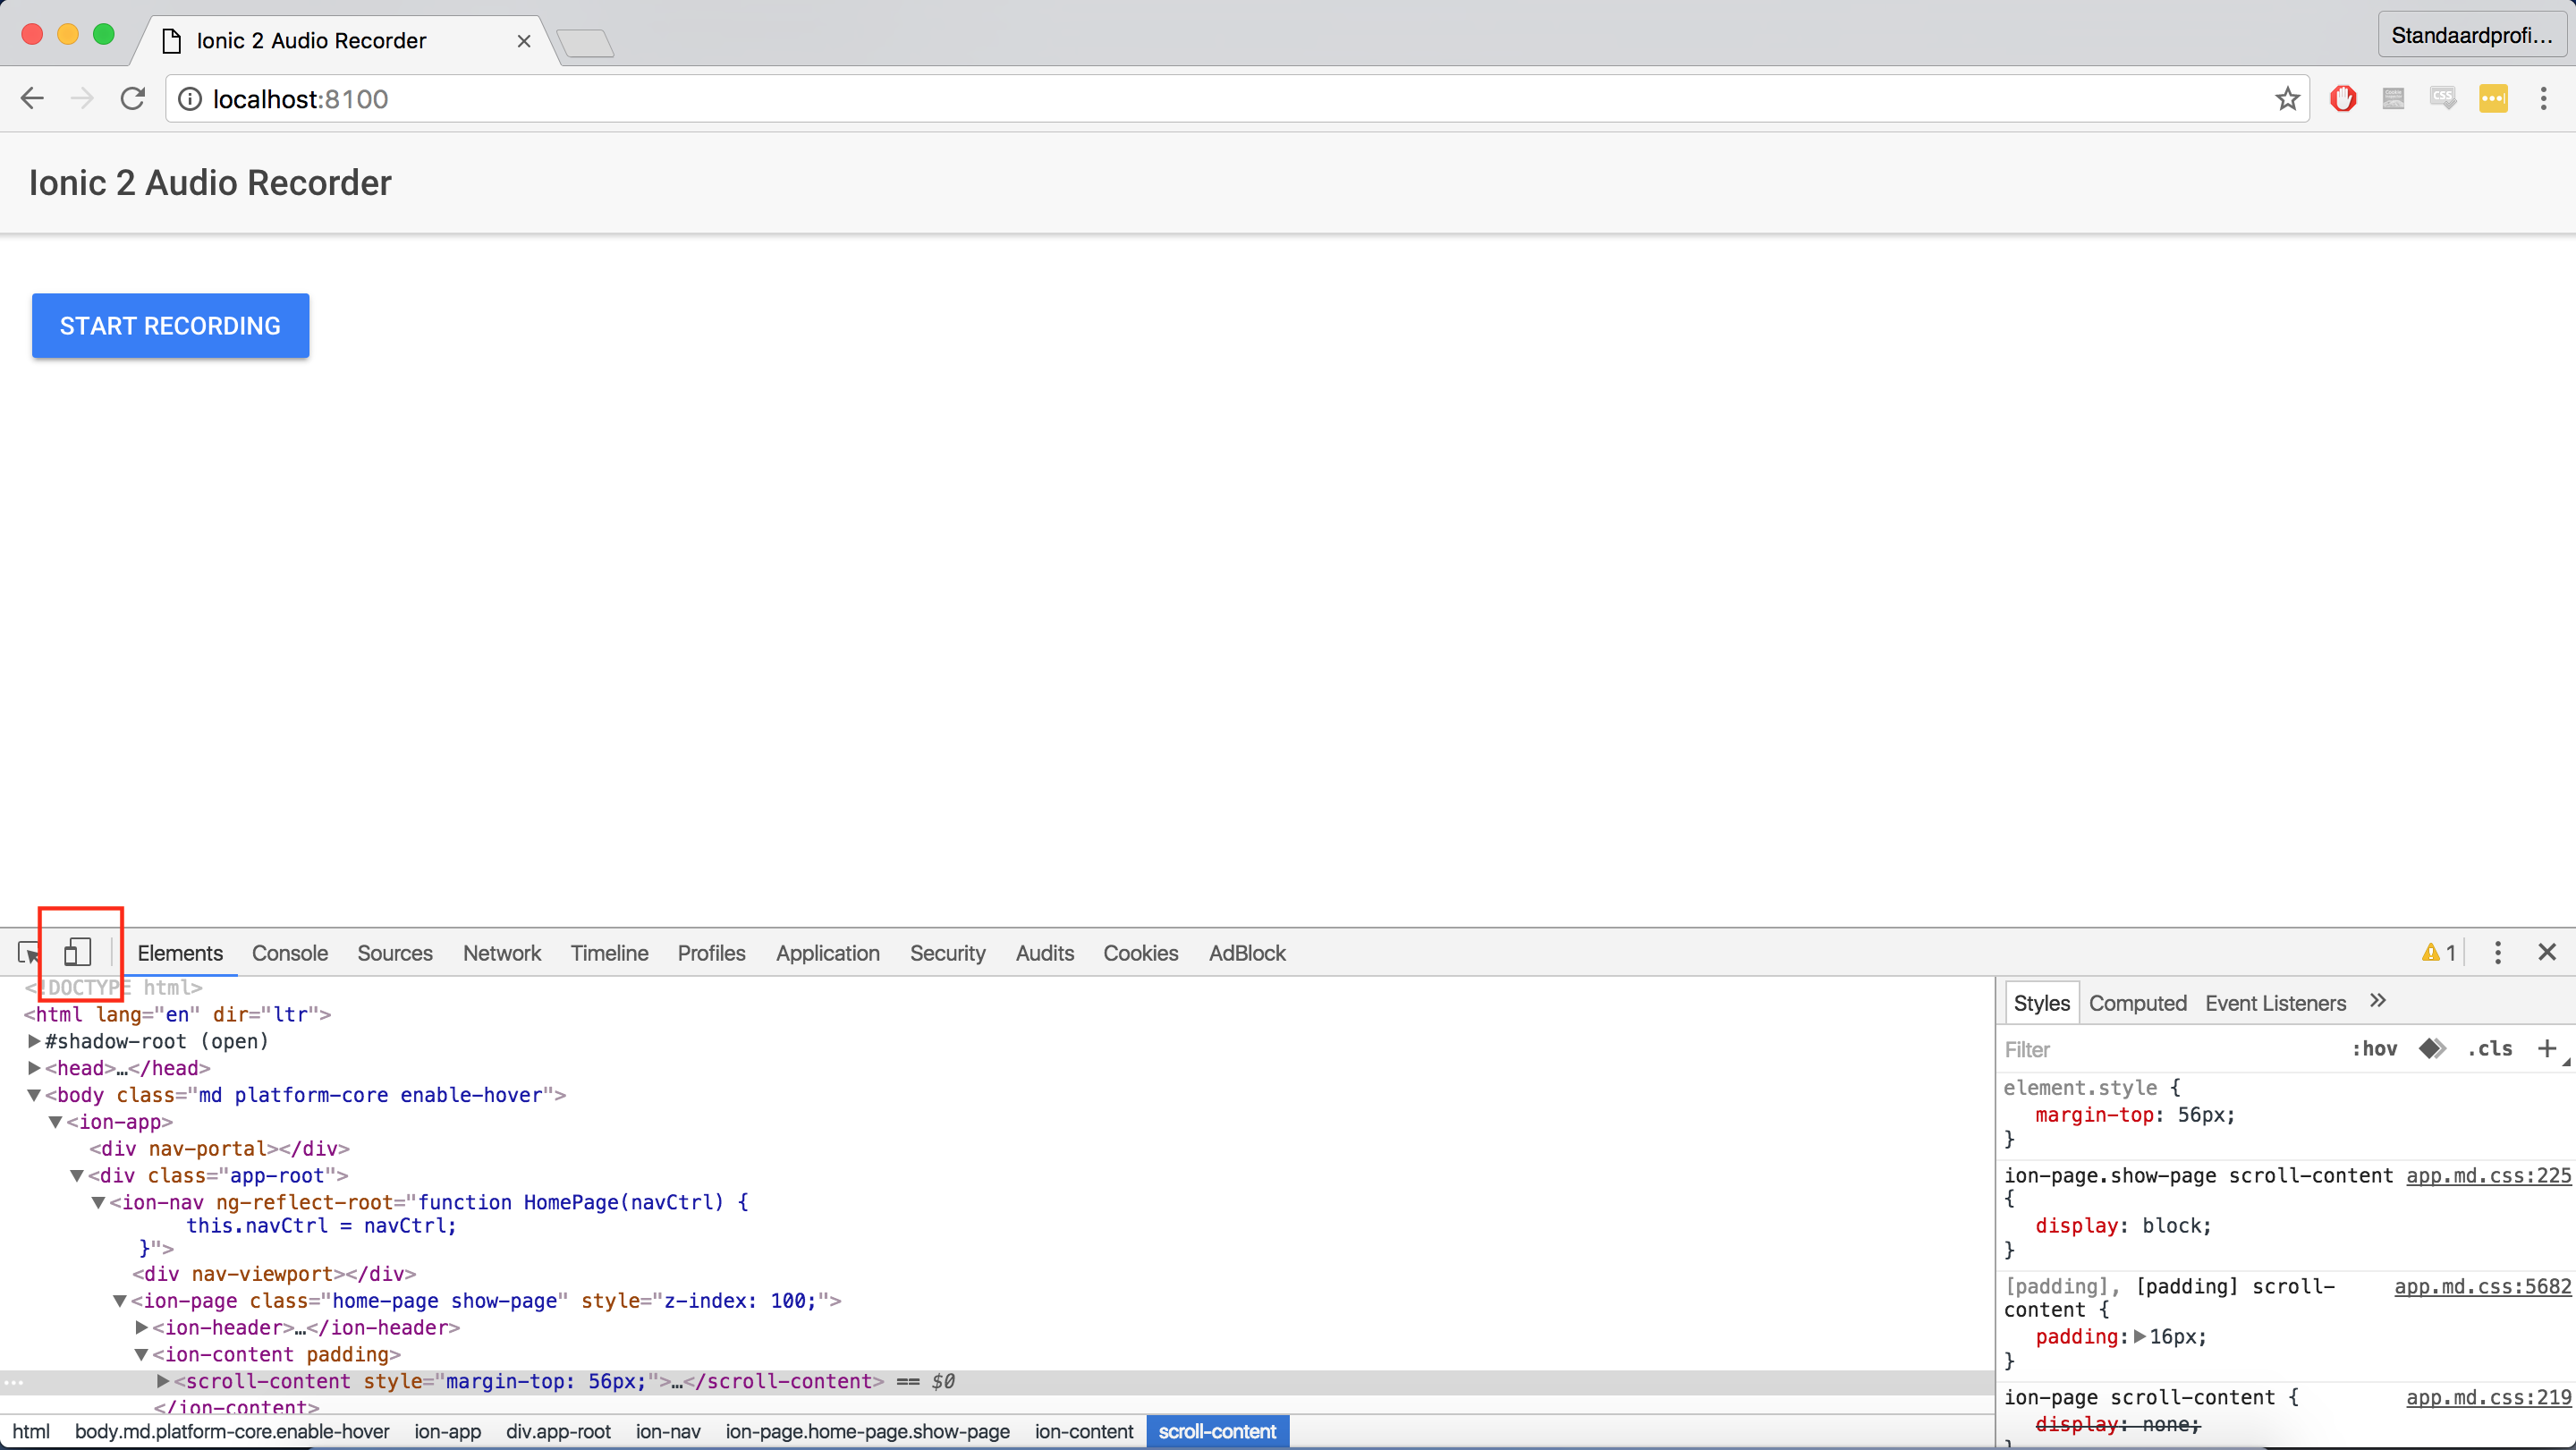
If we click on that icon, Google Chrome will render the page as if it was rendered on a mobile device, correct screen proportions and all:
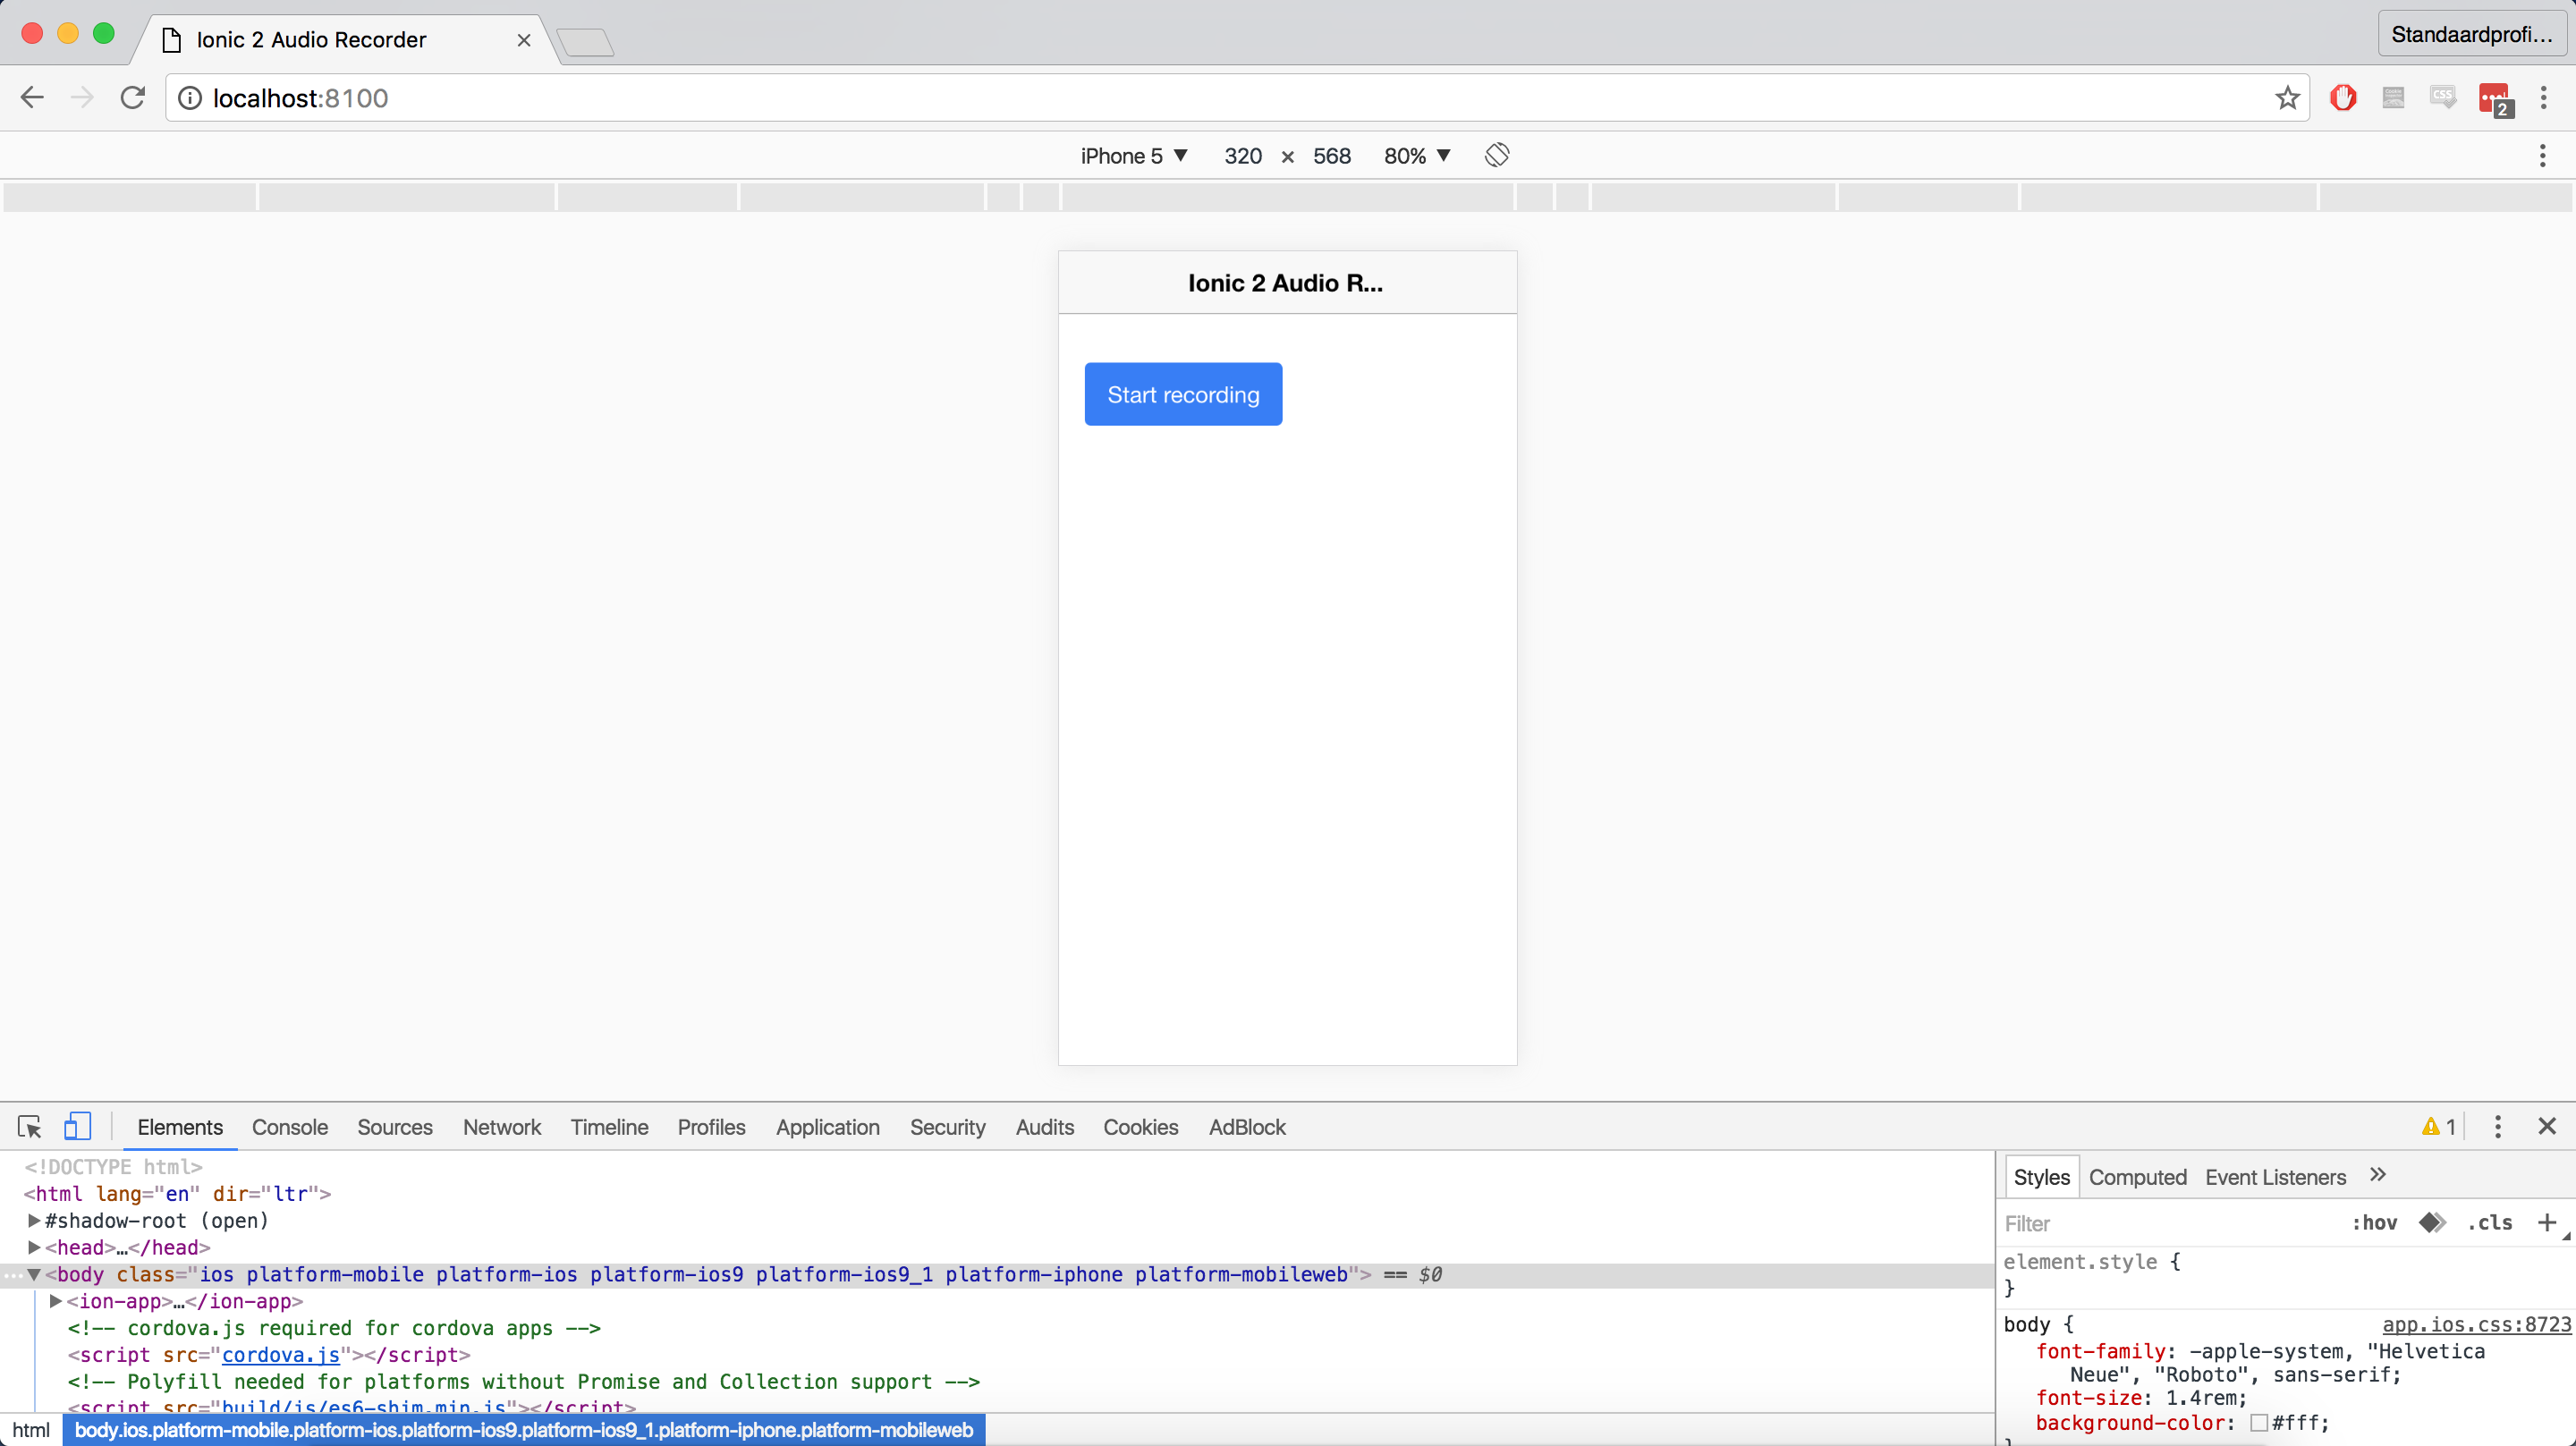
Note that you can also select other devices, change the dimensions, and much more.
Multi-platform preview
One great feature of Ionic is that it will adjust the look and feel of your app depending on the platform it runs on. To easily see the differences between these platforms, you can start the ionic serve command with the --lab parameter:
ionic serve --lab
This results in the preview window showing all three platforms side-by-side:
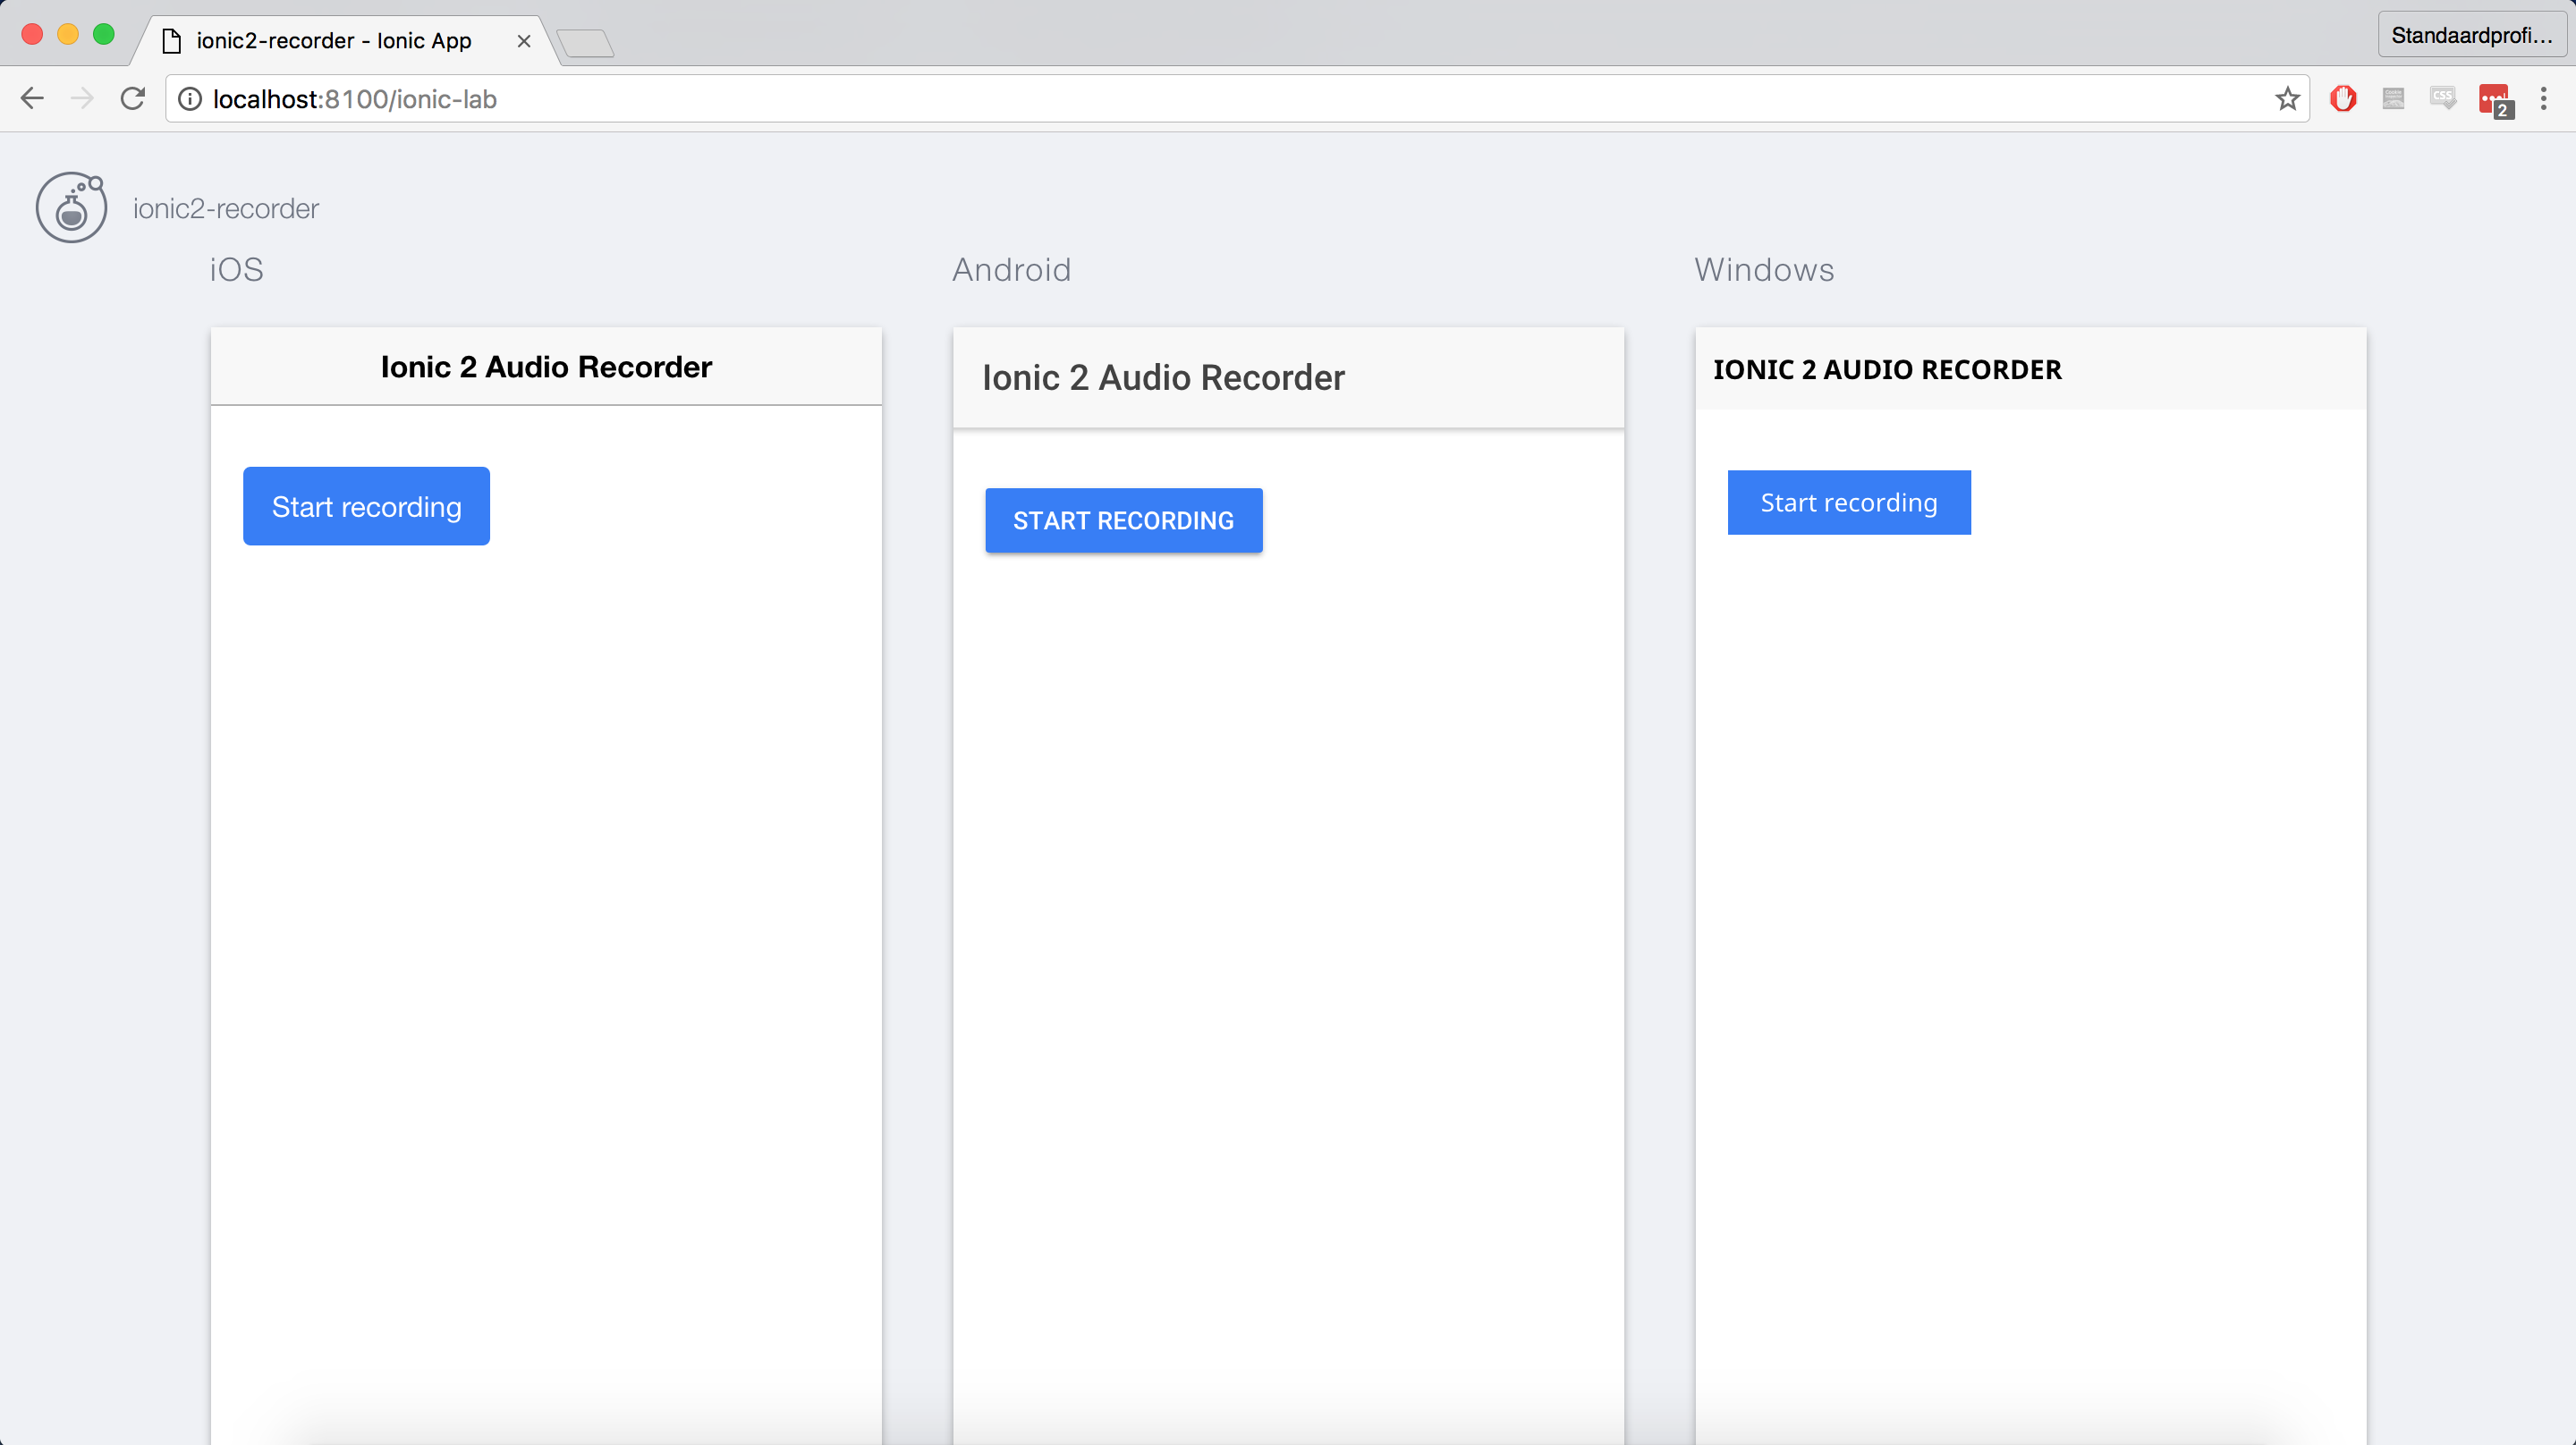
Although the difference is not huge in this case, the buttons and headers do have a different look-and-feel for each platform, even though they all run the same code. Pretty neat, right?
Note: you should disable the device preview in the Developer Tools for this to display correctly.
Preparing for recording audio
Now it’s time to start adding audio recording functionality to our app. Recording audio is a native capability: it requires access to a microphone. Therefore, we can’t test our recording functionality in the browser, we’ll have to use an actual device (or simulator).
To run our app on a device or simulator, Ionic uses Cordova. The first step is thus to install Cordova:
npm install -g cordova
Now that Cordova has been installed, the next step is to install the ionic-native plugin:
npm install ionic-native --save
The purpose of Ionic Native is to provide Ionic-friendly wrappers around Cordova plugins, which in turn allow access to the device’s API’s (such as the audio recording API). Schematically, it looks something like this:
The next step is to find the Ionic Native component that allows us to record audio, which is the MediaPlugin component. According to its documentation, it depends on the cordova-plugin-media plugin, which we can install using the CLI:
ionic plugin add cordova-plugin-media
We now have all the prerequisites to record audio in our app. But what file should contain our audio recording code? Let’s recall the structure of the app directory:
At the moment, we have only one page: the home page, which is defined by the three files in the home directory:
home.html: defines the interface of our home page.home.scss: defines any custom styling of our home page.home.ts: defines the logic of the home page.
Clearly, we’ll have to add our audio recording code to home.ts, which looks like this:
import { Component } from '@angular/core';
import { NavController } from 'ionic-angular';

@Component({
  templateUrl: 'build/pages/home/home.html'
})
export class HomePage {
  constructor(public navCtrl: NavController) {

  }
}
It turns out that an Ionic 2 page is just a regular Angular 2 component, nothing fancy.
Note that the template URL must be relative to the directory where the app’s compiled HTML/JavaScript/CSS is located: the build directory.
Recording audio
To import the MediaPlugin component in our home.ts file, we add the following import statement:
import { MediaPlugin } from "ionic-native";
In the MediaPlugin component’s documentation, we noticed it had a startRecord function, exactly what we need!
Note: if you don’t like to read documentation, most editors also have code-completion (due to Ionic 2 being written in TypeScript):
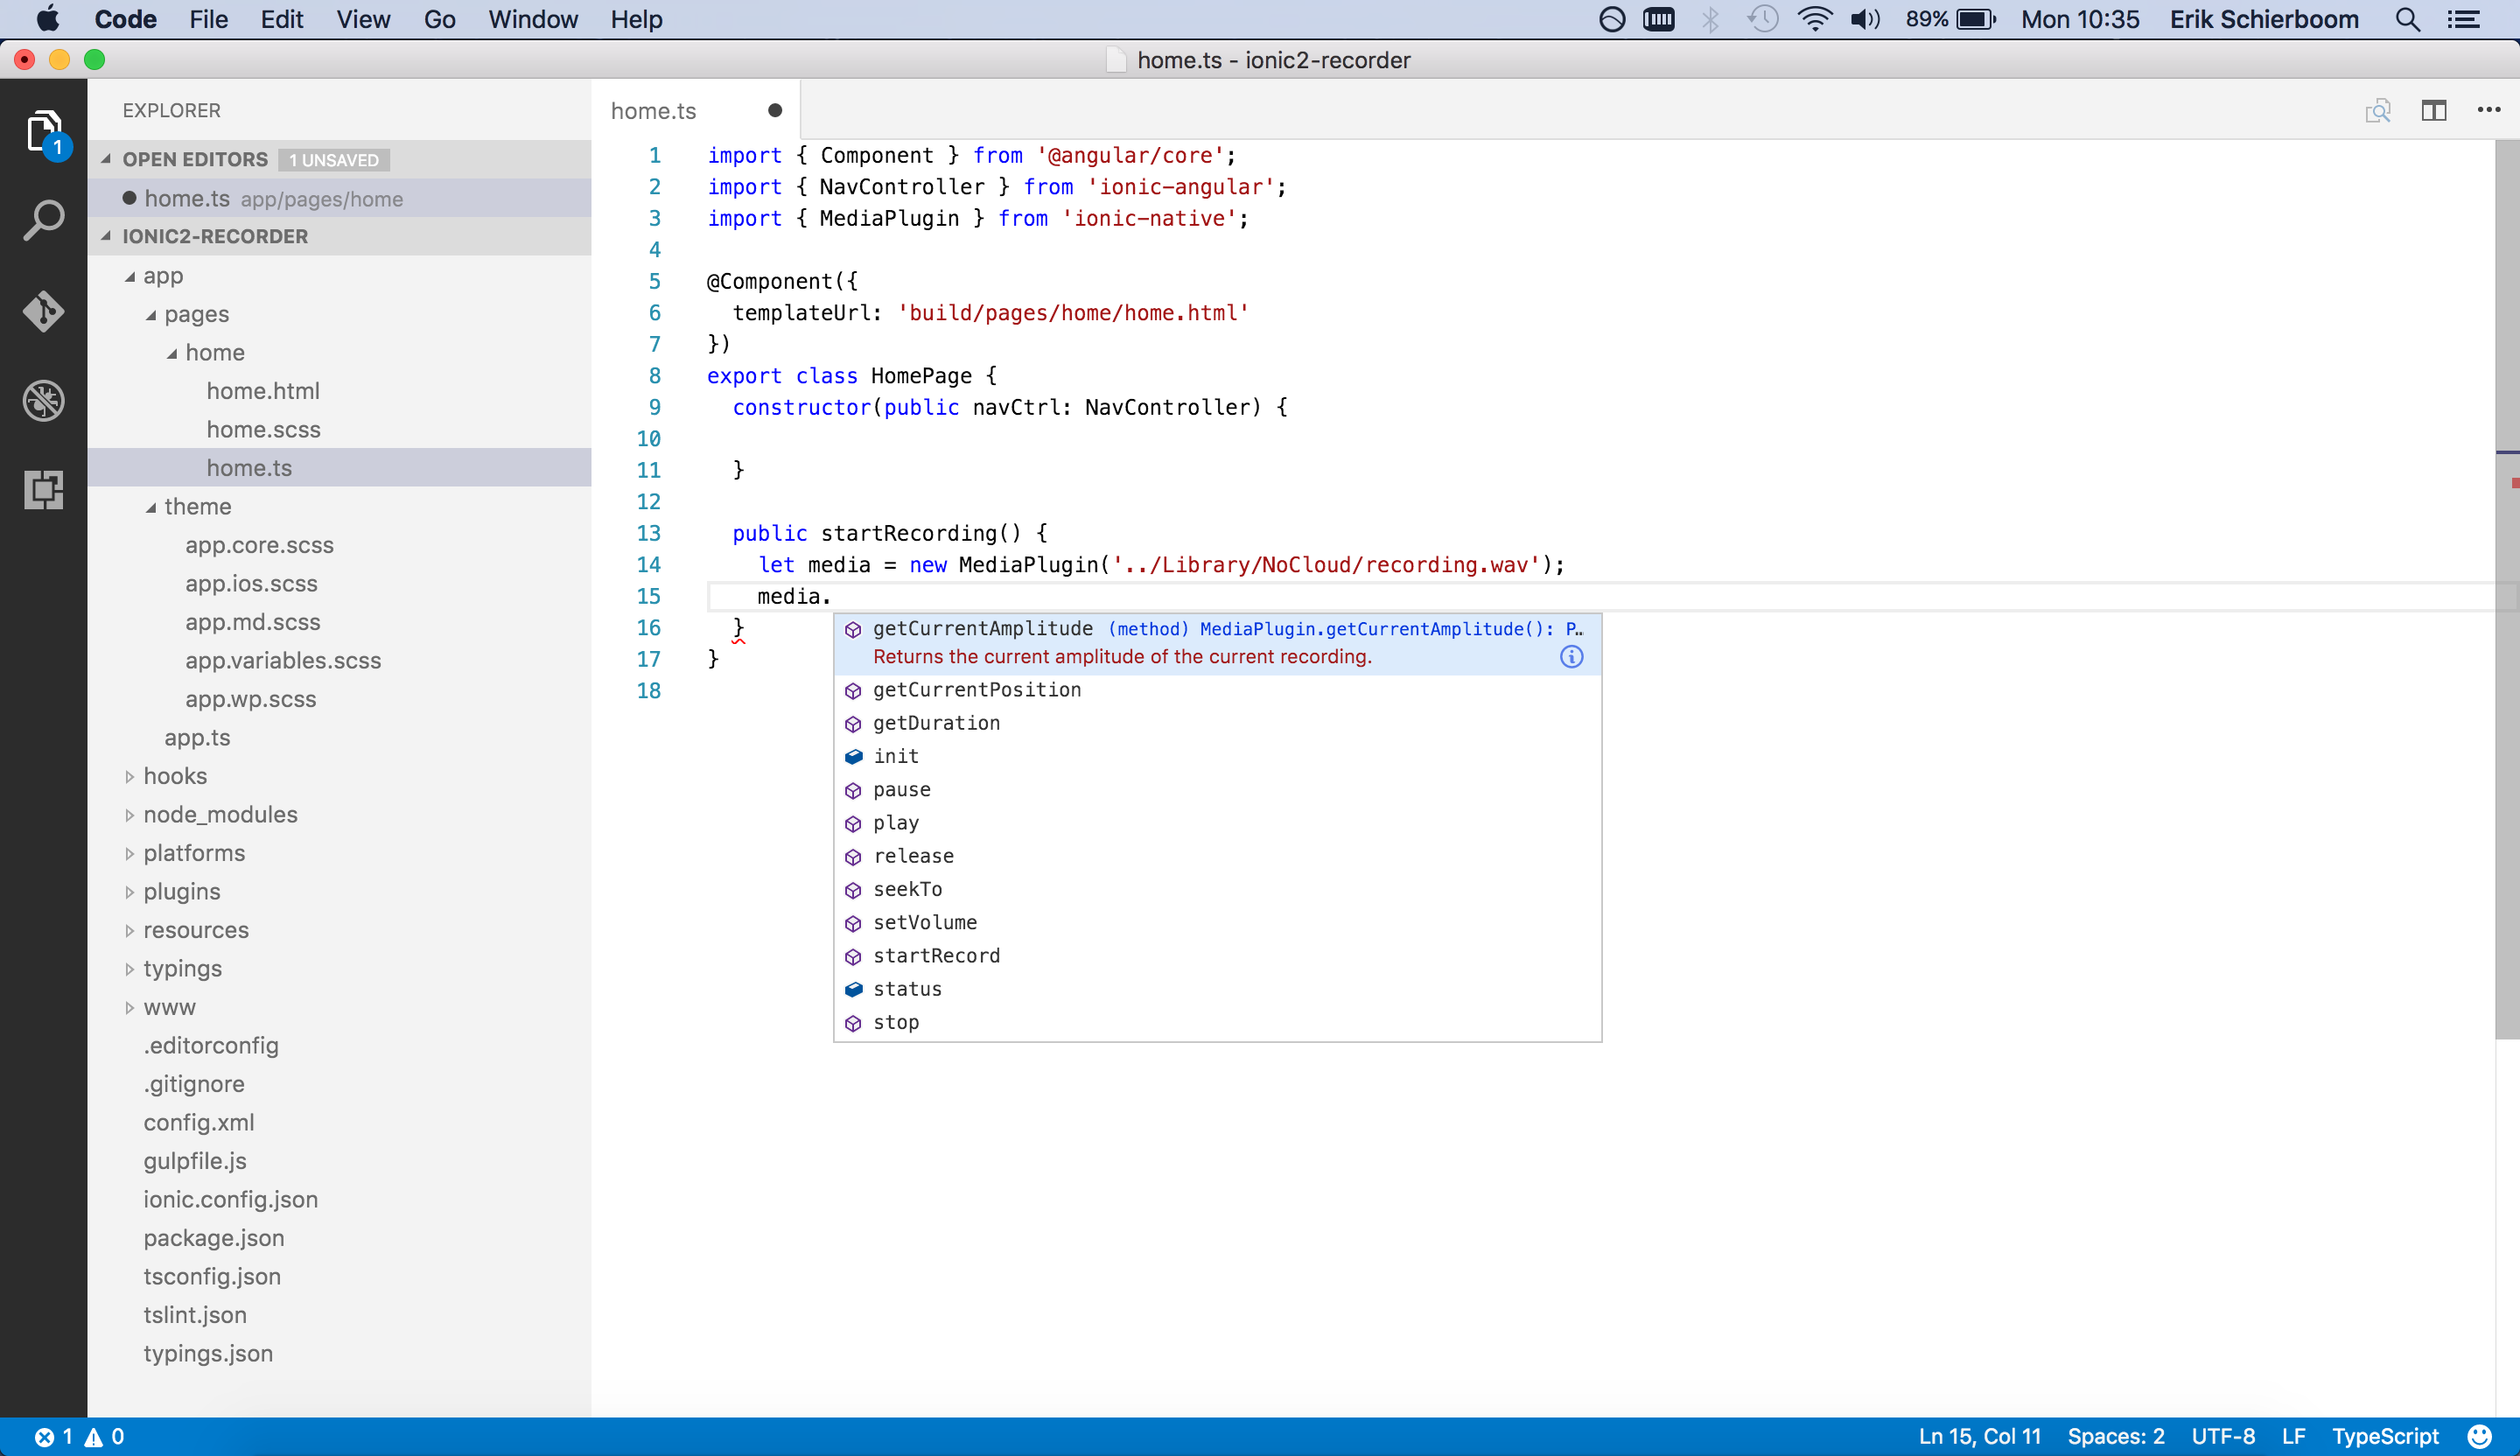
Let’s add a startRecording function to our HomePage class, in which we’ll start recording audio:
startRecording() {
  let media = new MediaPlugin('../Library/NoCloud/recording.wav');
  media.startRecord();
}
The final step is to call the startRecording function when the “Start recording” button is clicked:
<button (click)="startRecording()">Start recording</button>
You might be tempted to try this new functionality in the browser, but unfortunately, there will be an error:
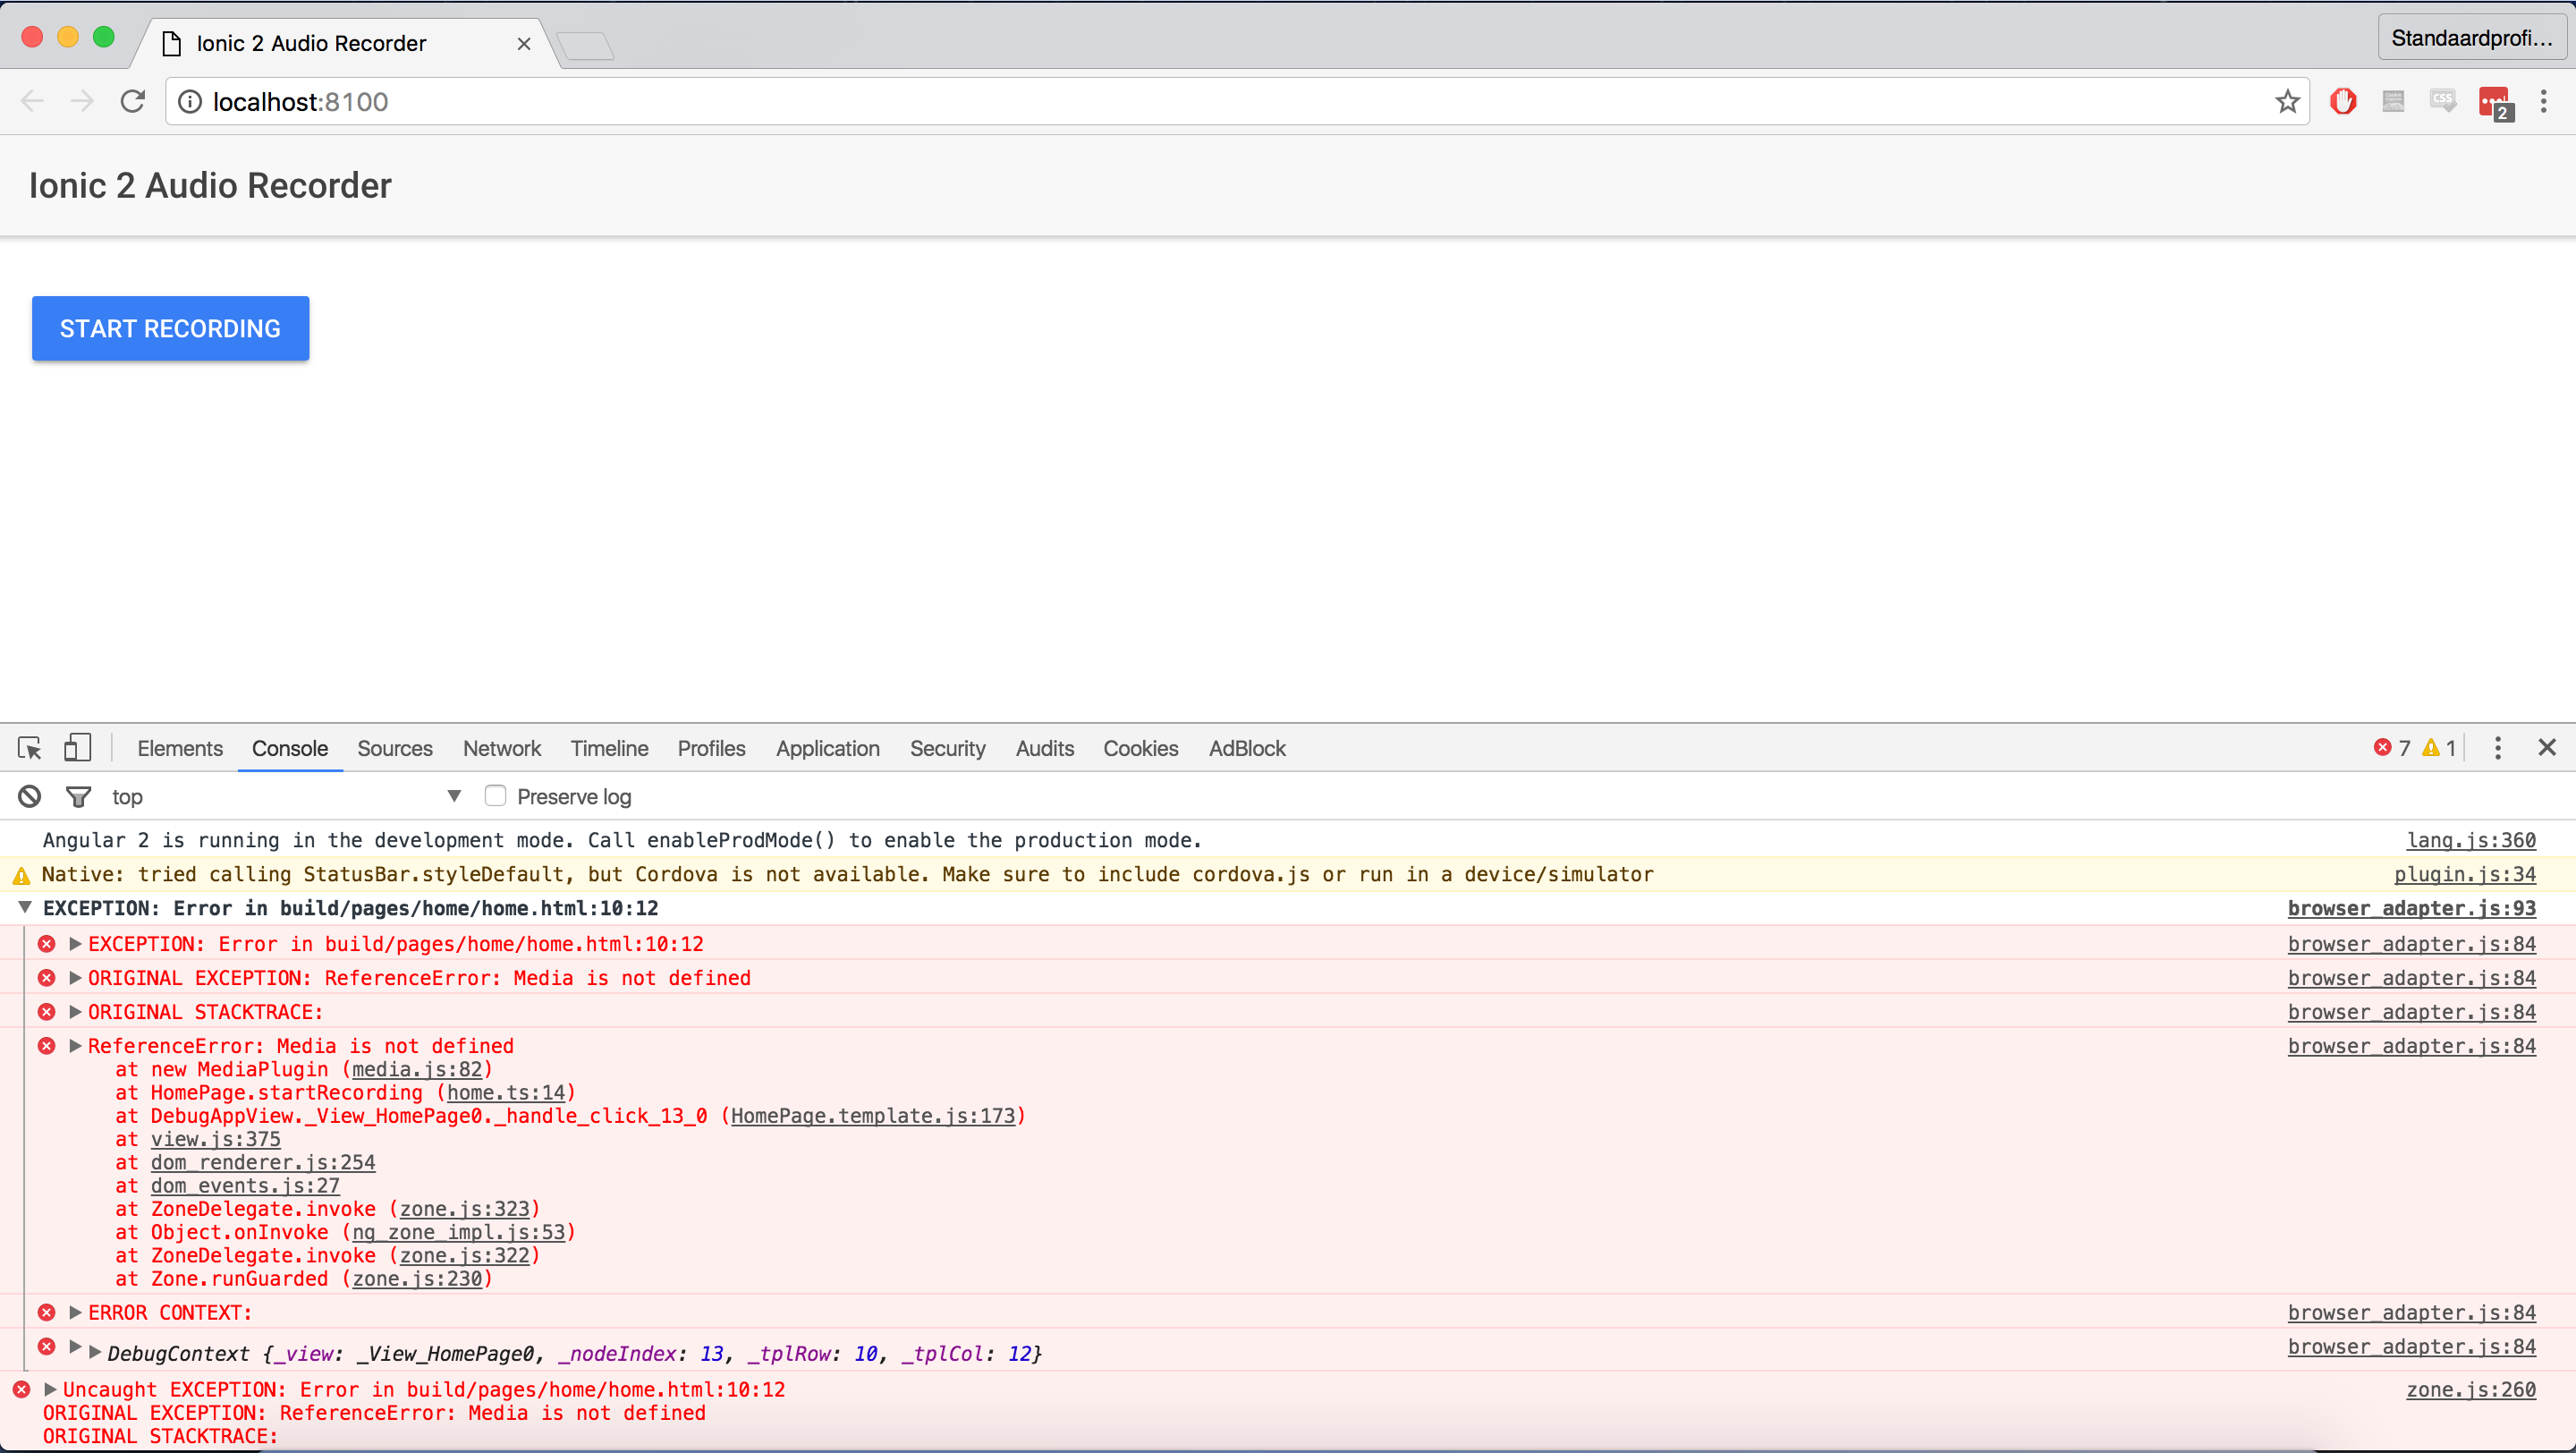
If you look at the error message more closely, it states that:
Hmmm, it appears it cannot find an instance of Media. Although this error message is a bit cryptic, there is a very simple explanation: we are trying to use the native audio recording capability, which is not supported in the browser. The solution is simple: we should test this code on a physical device or simulator.
Silently failing is not very user-friendly though, so let’s gracefully handle this error. First, we import the AlertController component:
import { NavController, AlertController } from "ionic-angular";
Next, we require an AlertController instance to be injected into our constructor:
constructor(public navCtrl: NavController,
            public alertCtrl: AlertController) {
}
We can then use this AlertController instance to create a helper method that will show an alert:
showAlert(message) {
  let alert = this.alertCtrl.create({
    title: 'Error',
    subTitle: message,
    buttons: ['OK']
  });
  alert.present();
}
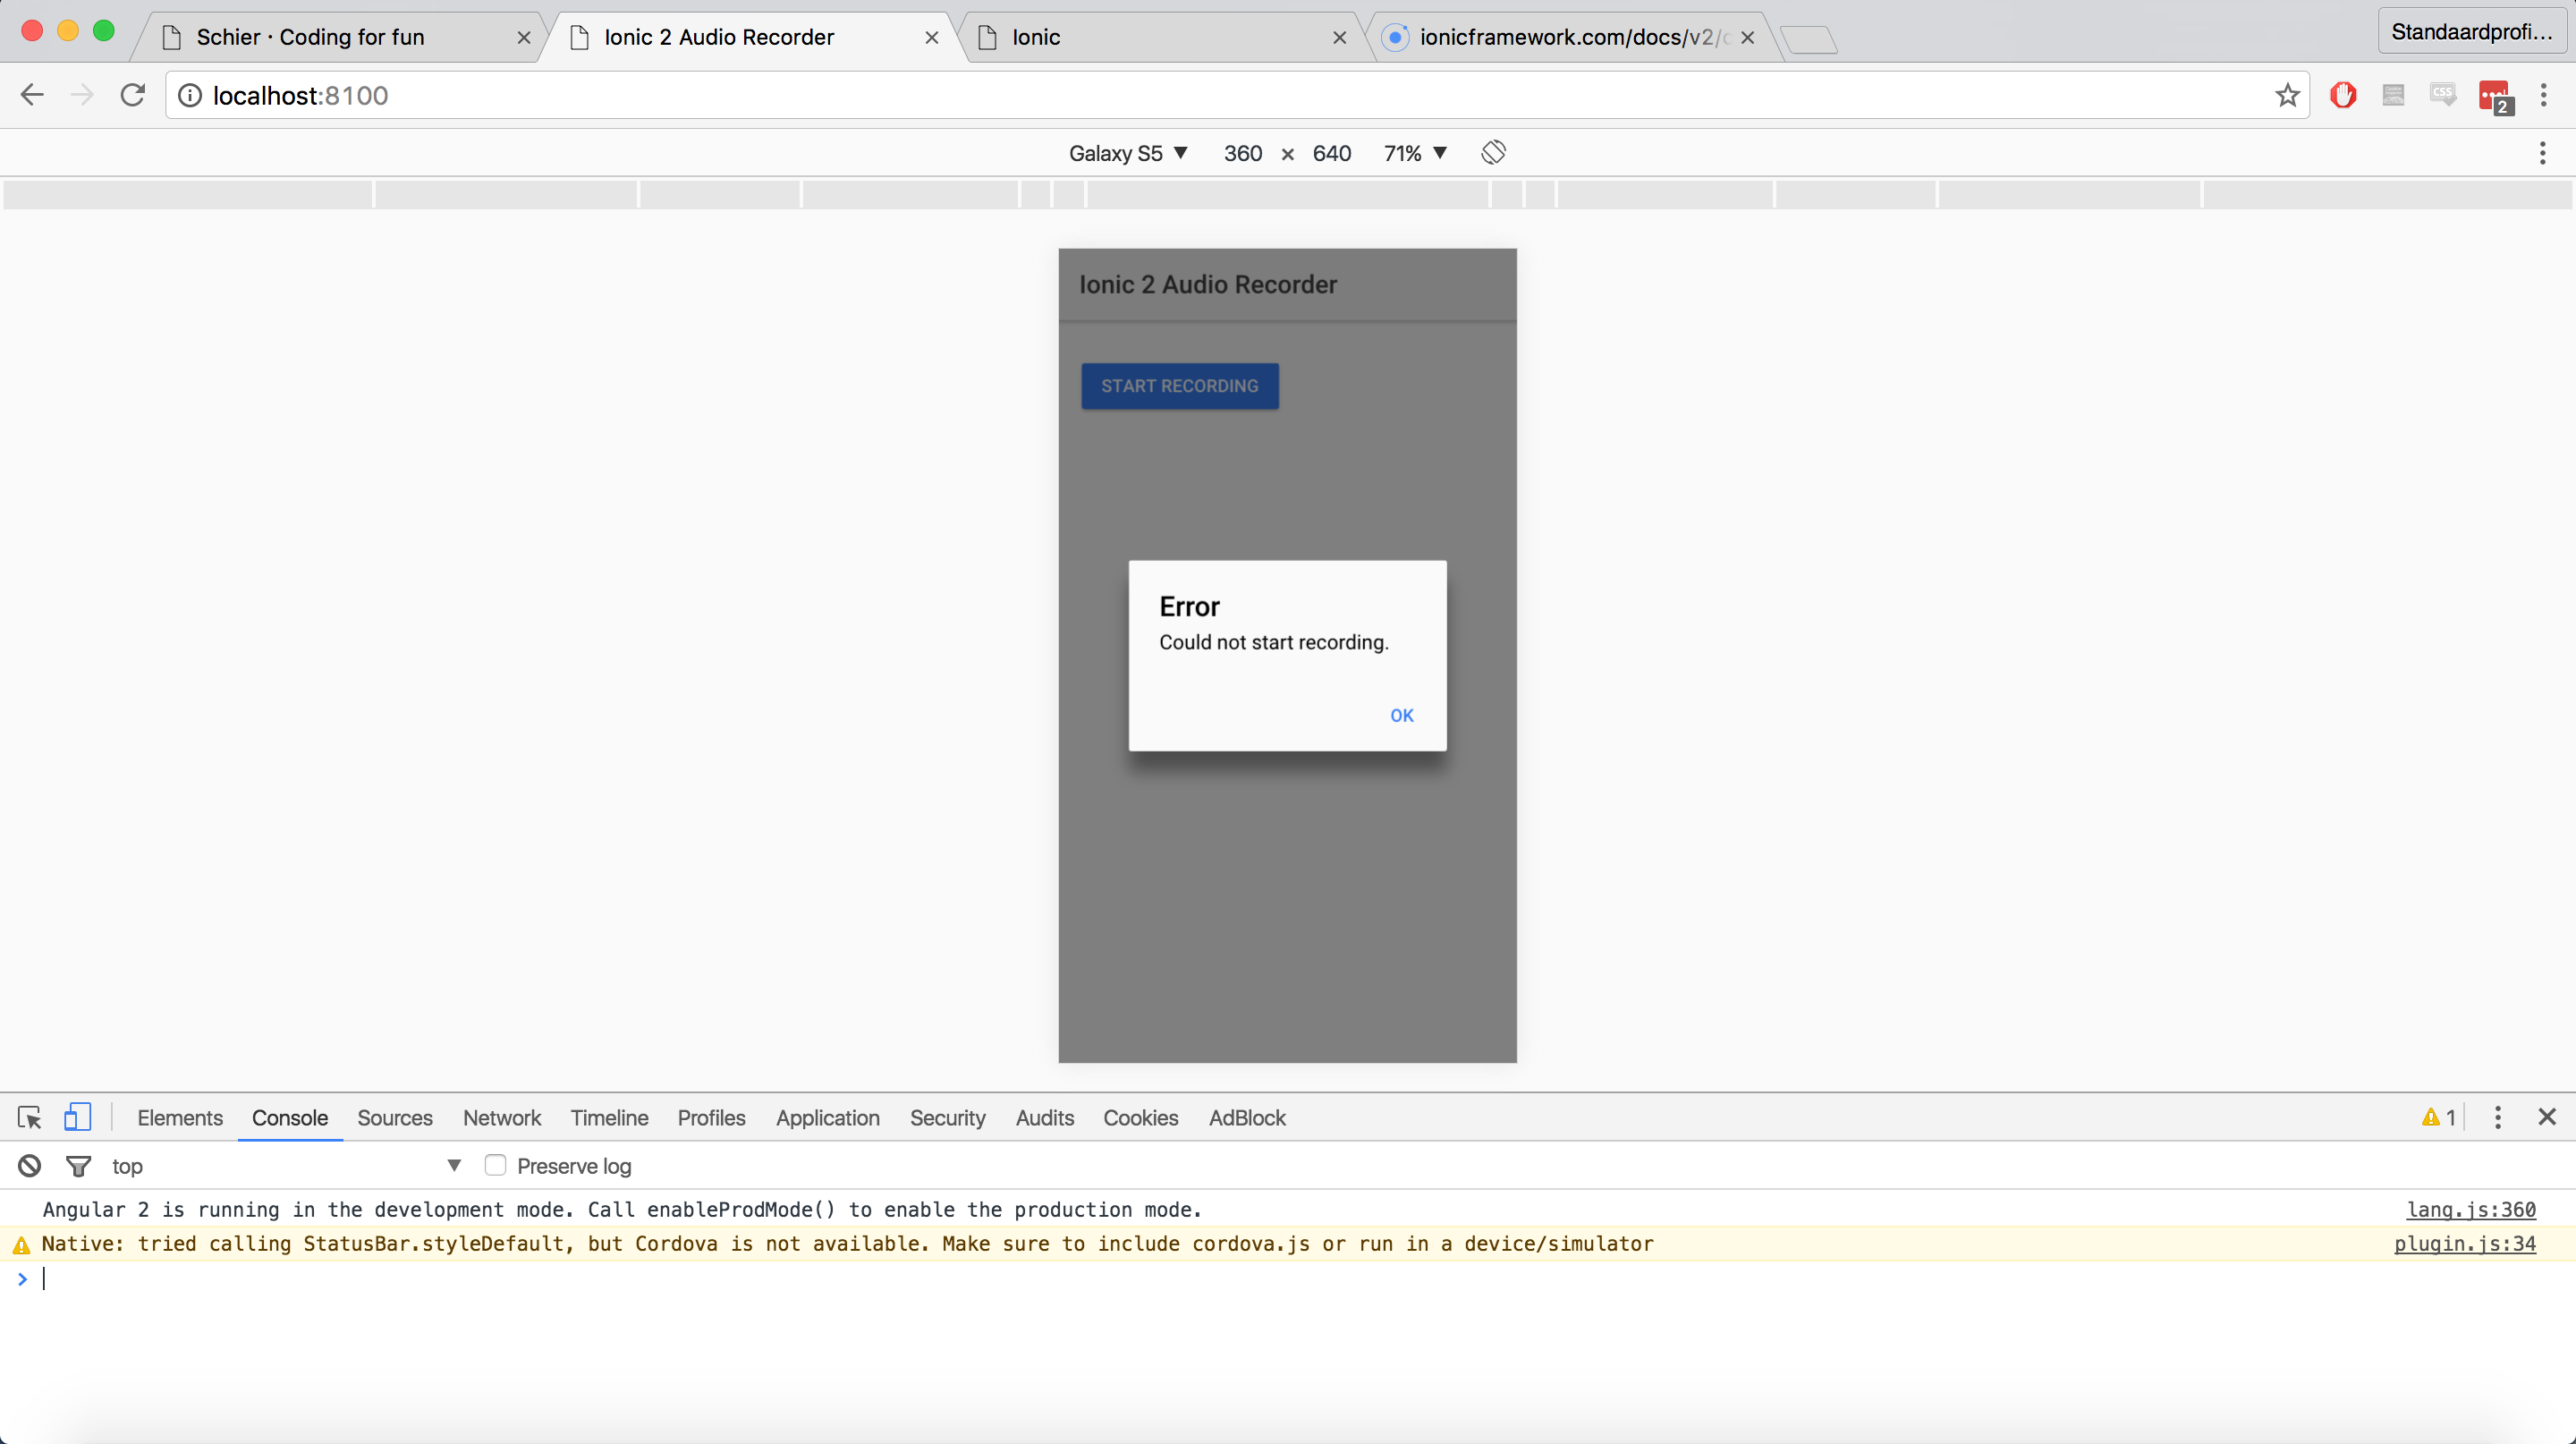
Finally, we’ll add a try/catch block to our startRecording function and use the showAlert function to show an alert:
startRecording() {
  try {
    let media = new MediaPlugin('../Library/NoCloud/recording.wav');
    media.startRecord();
  }
  catch (e) {
    this.showAlert('Could not start recording.');
  }
}
Now, if we run our application in the browser and click on the “Start recording” button, we’ll see a nice alert:
Running in a simulator
As said, to record audio we’ll need to use a device our simulator. In both cases, we need to ensure our app supports the iOS platform. We can list the platforms our app currently supports using:
ionic platform
For our app, it outputs the following:
Installed platforms: ios 4.1.1
Available platforms: amazon-fireos, android, blackberry10, browser, firefoxos, osx, webos
Clearly, our app already supports iOS. Note: this was done automatically by the CLI due to us scaffolding the app on a MacBook.
If iOS platform support would not have been installed, we could have installed it manually:
ionic platform add ios
To run our app in the iOS simulator, first make sure you have Xcode and an iOS simulator installed. If you have those prerequisites installed, we can run our app in the simulator using:
ionic emulate ios
This time, there is far more going on in the background:
The build script doesn’t just compile our app to HTML, JavaScript and CSS files, but this time it compiles our app to a real, native iOS app. The reason for this is simple: you can only run native apps in the simulator.
Once the native app has been compiled, the simulator will pop-up and our app is shown:

Clicking on the “Start recording” button does not result in an error this time. However, we cannot verify if it actually recorded anything, so let’s fix this.
Adding audio playback support
To allow us to playback the recorded audio, we need to add several functions to the HomePage class:
- A function to stop recording (which will save the recorded audio to file).
- A function to playback the saved recording.
- A function to stop the playback of the saved recording.
As all these functions need access to the same MediaPlugin instance, let’s store it in a private field:
export class HomePage {
  media: MediaPlugin = new MediaPlugin("../Library/NoCloud/recording.wav");
}
Next, we modify the existing startRecording function to use this private field and add the other functions:
startRecording() {
  try {
    this.media.startRecord();
  }
  catch (e) {
    this.showAlert('Could not start recording.');
  }
}

stopRecording() {
  try {
    this.media.stopRecord();
  }
  catch (e) {
    this.showAlert('Could not stop recording.');
  }
}

startPlayback() {
  try {
    this.media.play();
  }
  catch (e) {
    this.showAlert('Could not play recording.');
  }
}

stopPlayback() {
  try {
    this.media.stop();
  }
  catch (e) {
    this.showAlert('Could not stop playing recording.');
  }
}
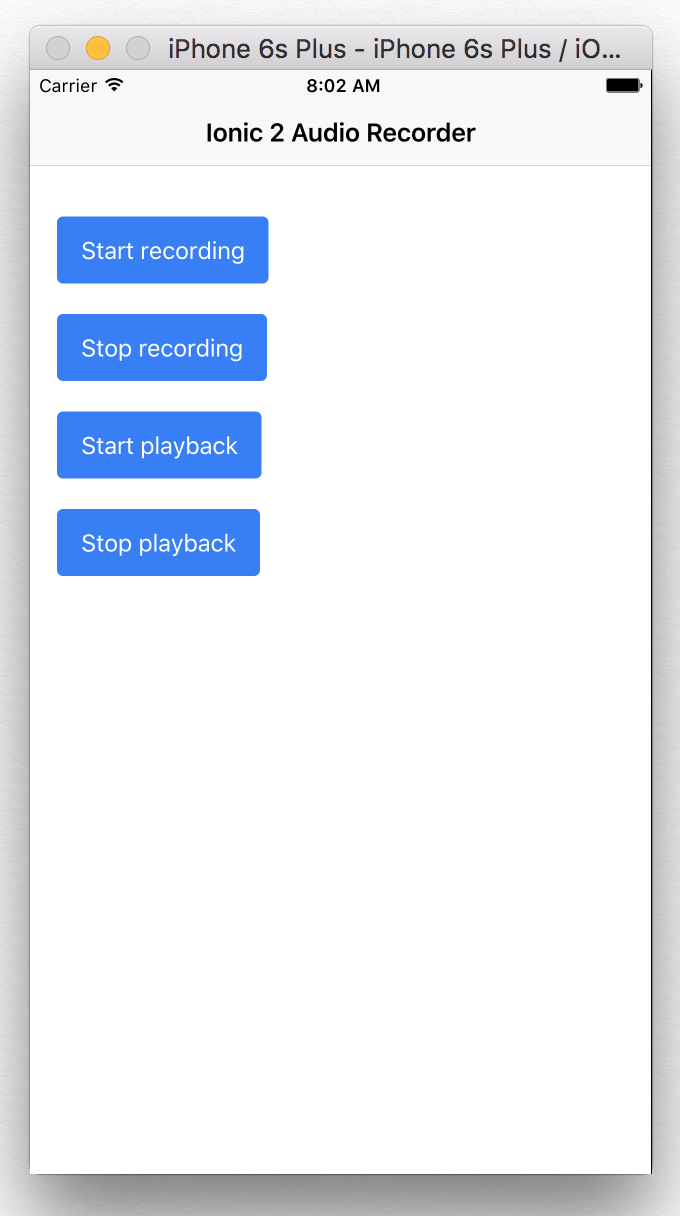
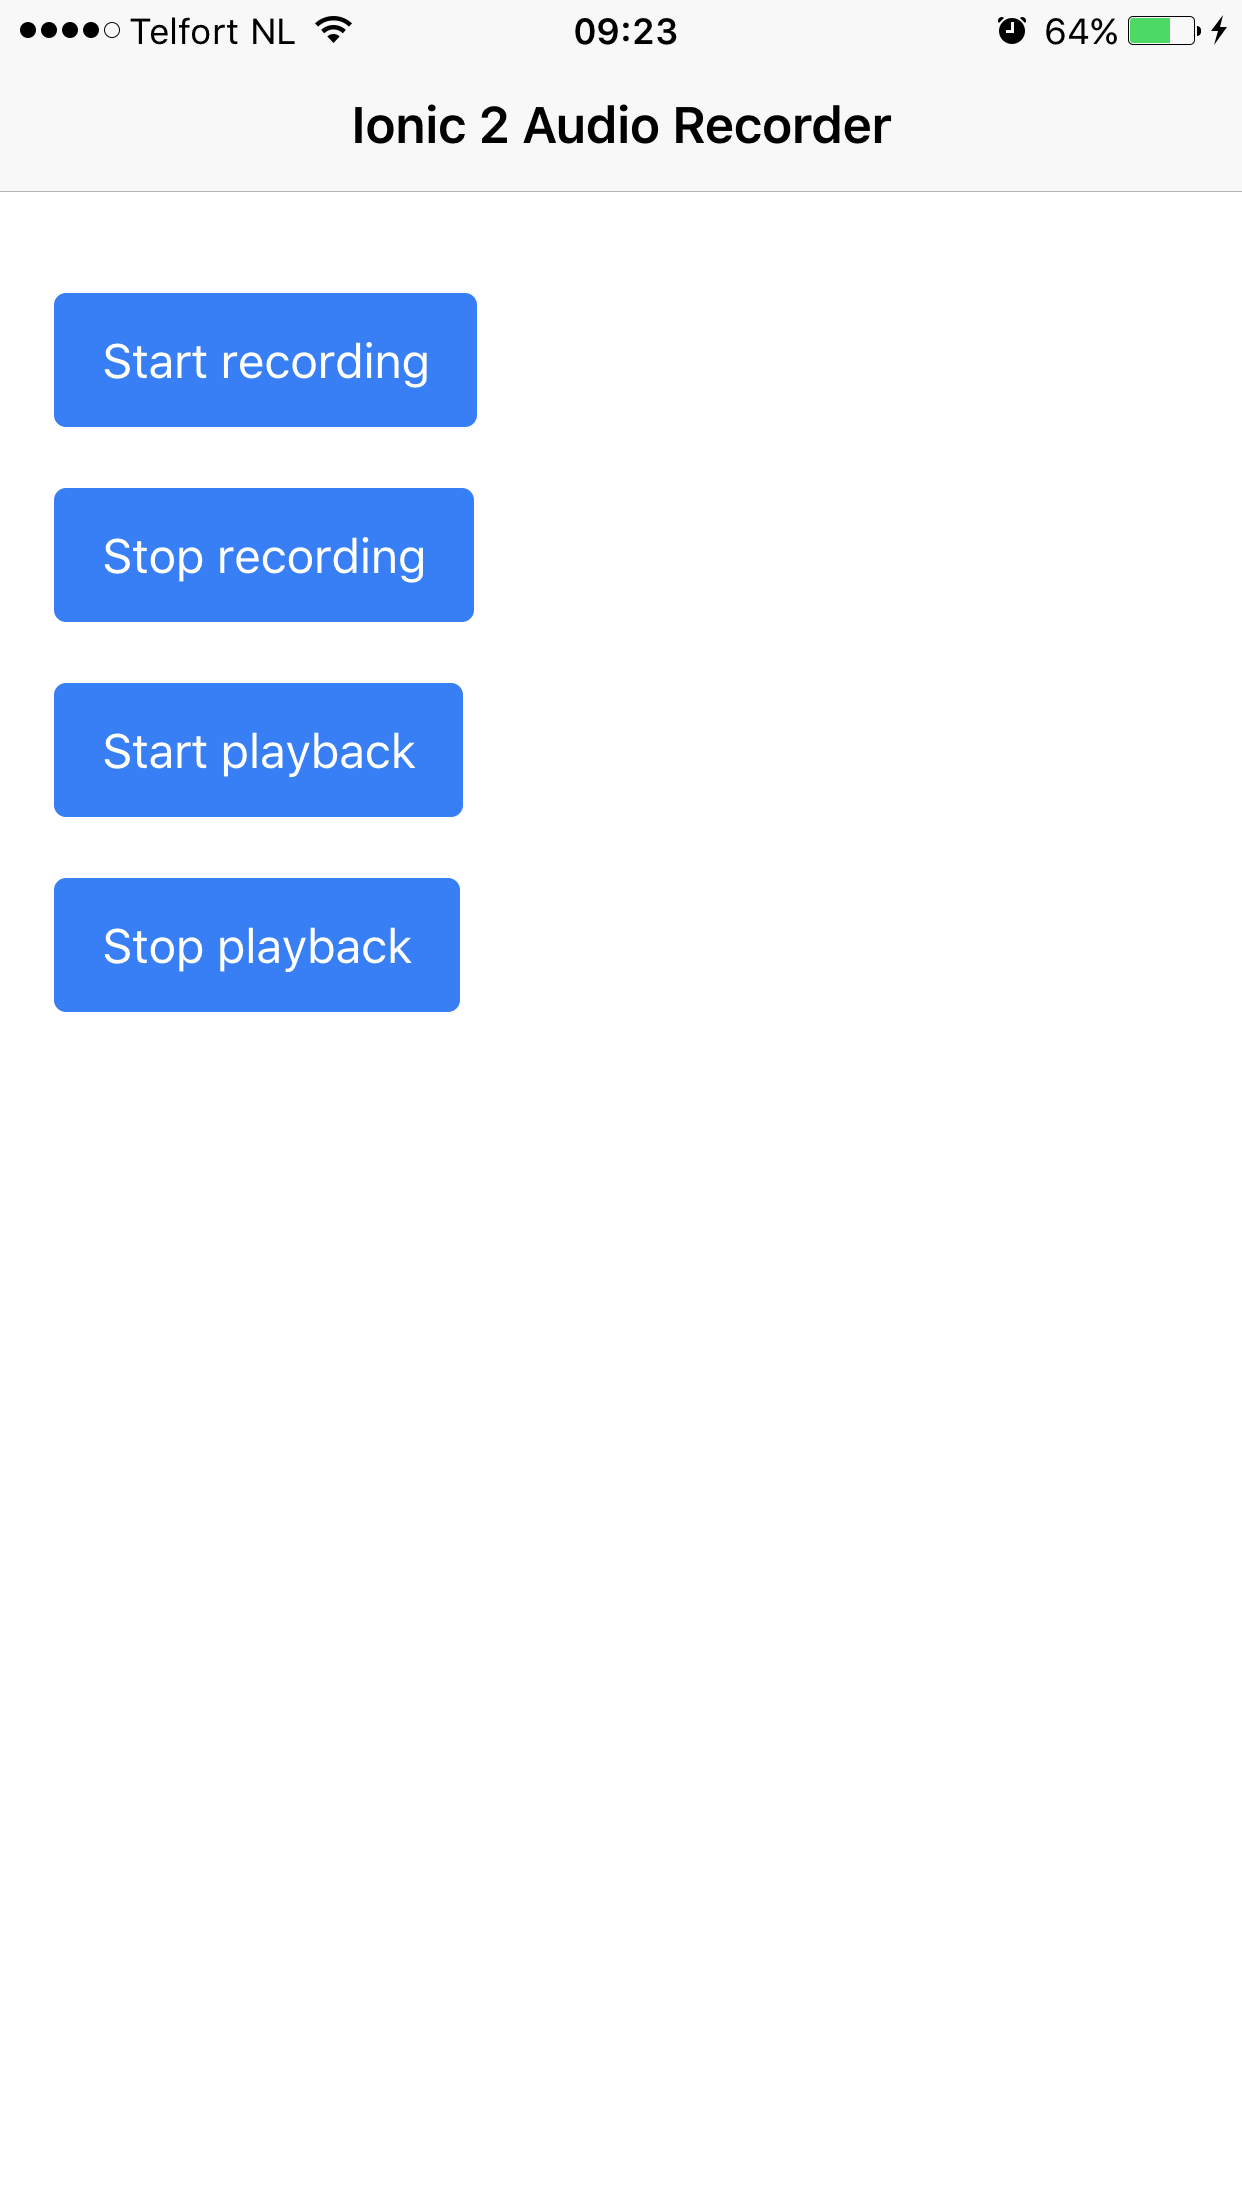
Finally, we’ll update home.html to have a button for each function:
<p>
  <button (click)="startRecording()">Start recording</button>
</p>
<p>
  <button (click)="stopRecording()">Stop recording</button>
</p>
<p>
  <button (click)="startPlayback()">Start playback</button>
</p>
<p>
  <button (click)="stopPlayback()">Stop playback</button>
</p>
Let’s run our app again:
Unfortunately, the screen is blank, indicating that an error occured. As it turns out, this error is due to the MediaPlugin instance being created when the class is constructed. At that point, the native media plugin will not yet have been loaded, so creating the MediaPlugin instance throws an error.
So what is the right time to create our shared MediaPlugin instance? Well, let’s look at the lifecycle events for an Ionic component (in order of occurance):
ionViewLoaded: runs when the page has loaded.ionViewWillEnter: runs when the page is about to enter and become the active page.ionViewDidEnter: runs when the page has fully entered and is now the active page.ionViewWillLeave: runs when the page is about to leave and no longer be the active page.ionViewDidLeave: runs when the page has finished leaving and is no longer the active page.ionViewWillUnload: runs when the page is about to be destroyed and have its elements removed.ionViewDidUnload: runs after the page has been destroyed and its elements have been removed.
Let’s try to initialize the MediaPlugin in the ionViewLoaded function:
export class HomePage {
  media: MediaPlugin;

  ionViewLoaded() {
    this.media = new MediaPlugin('../Library/NoCloud/recording.wav')
  }

  ...
}
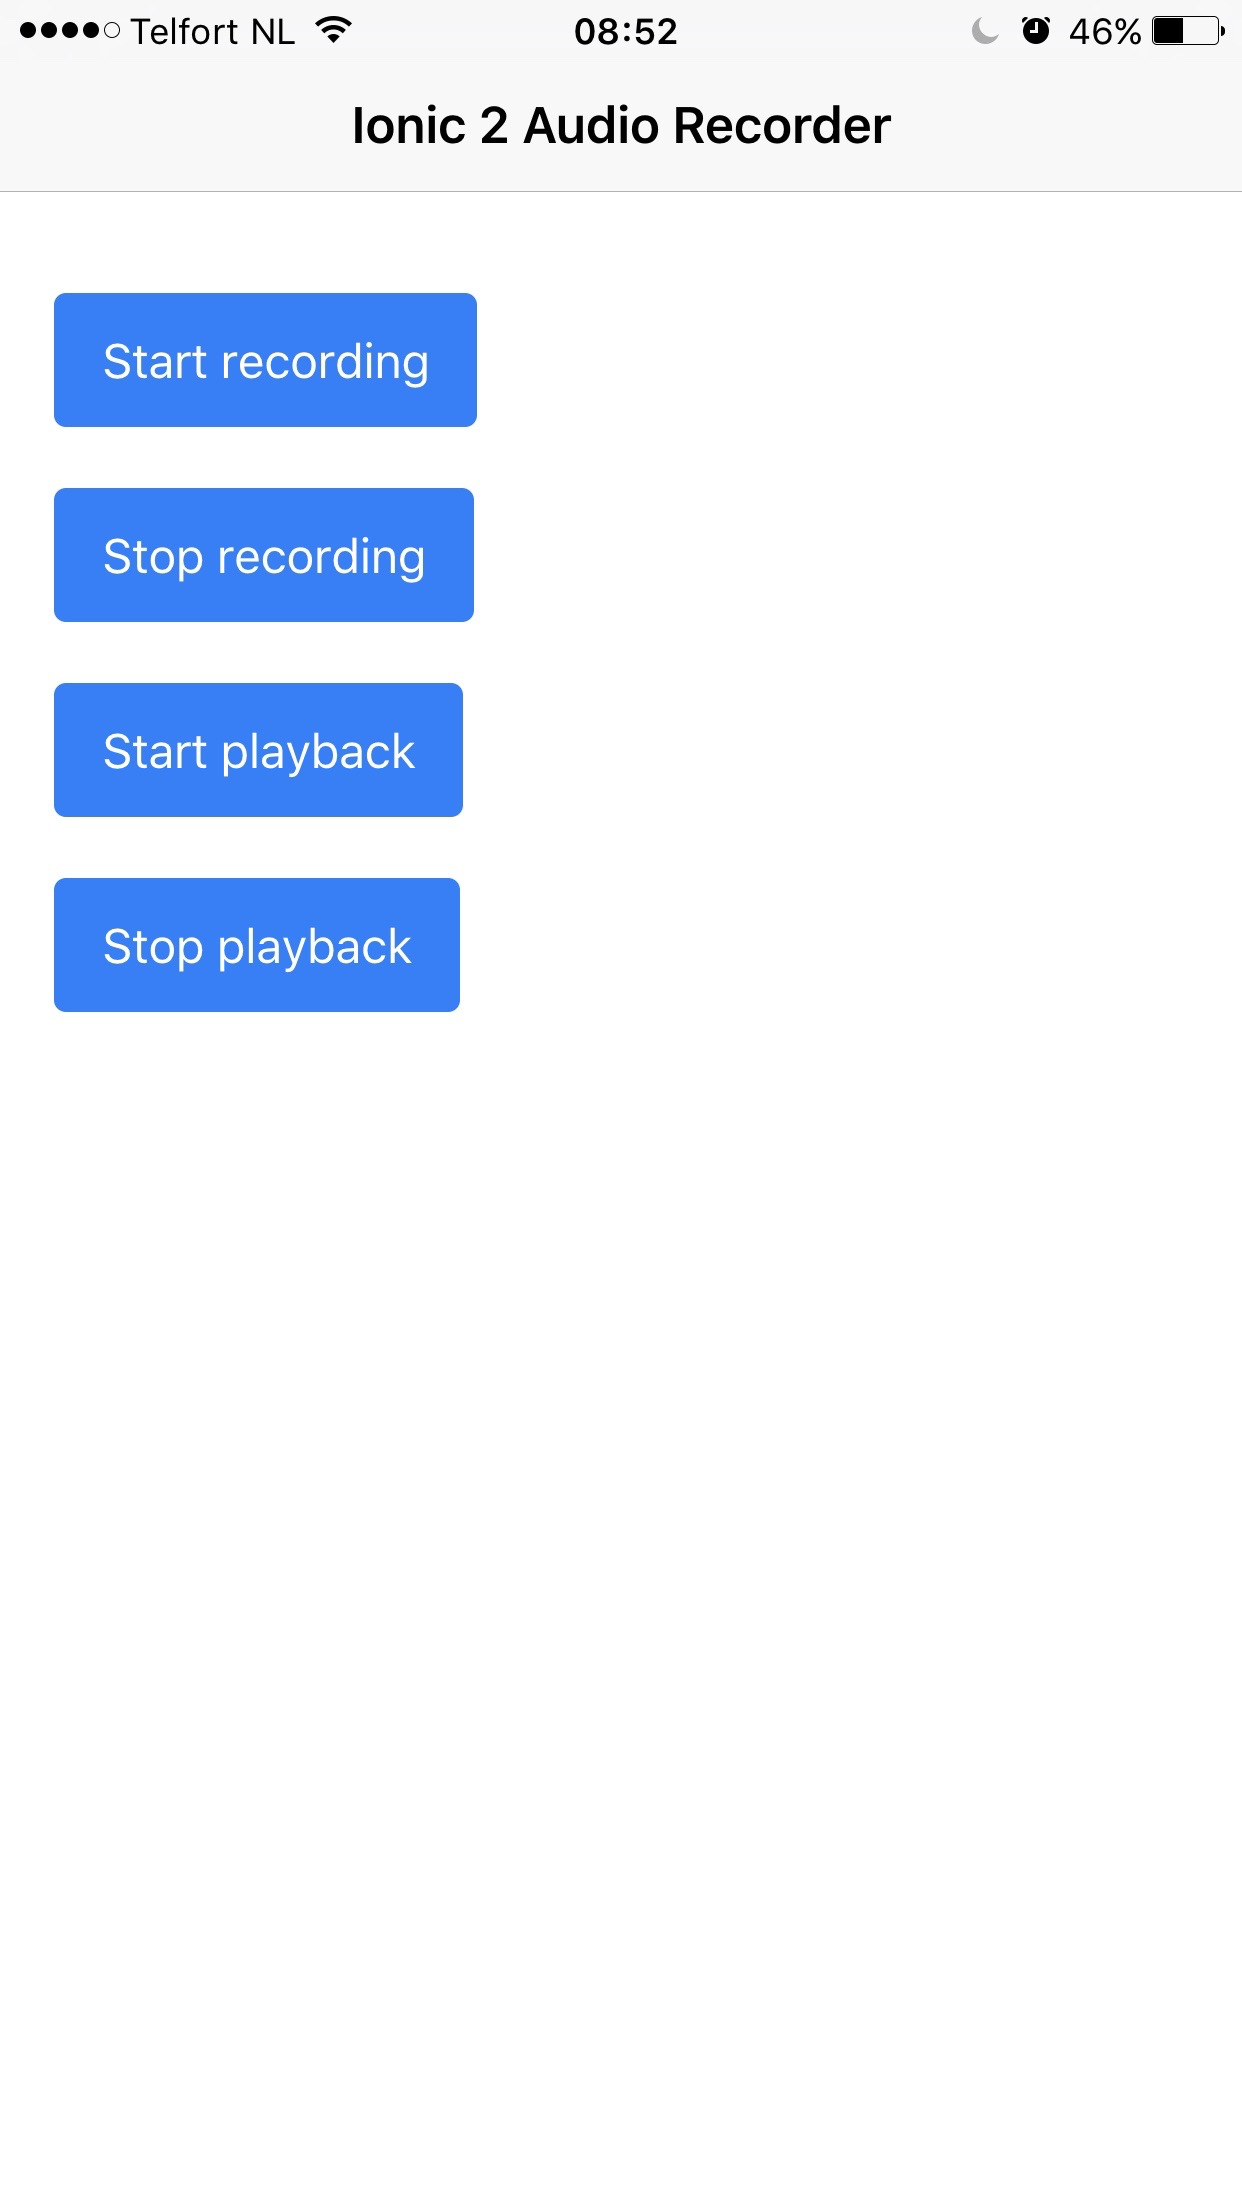
If we run our app, the GUI is shown this time, but clicking on the “Start recording” button still issues an error:
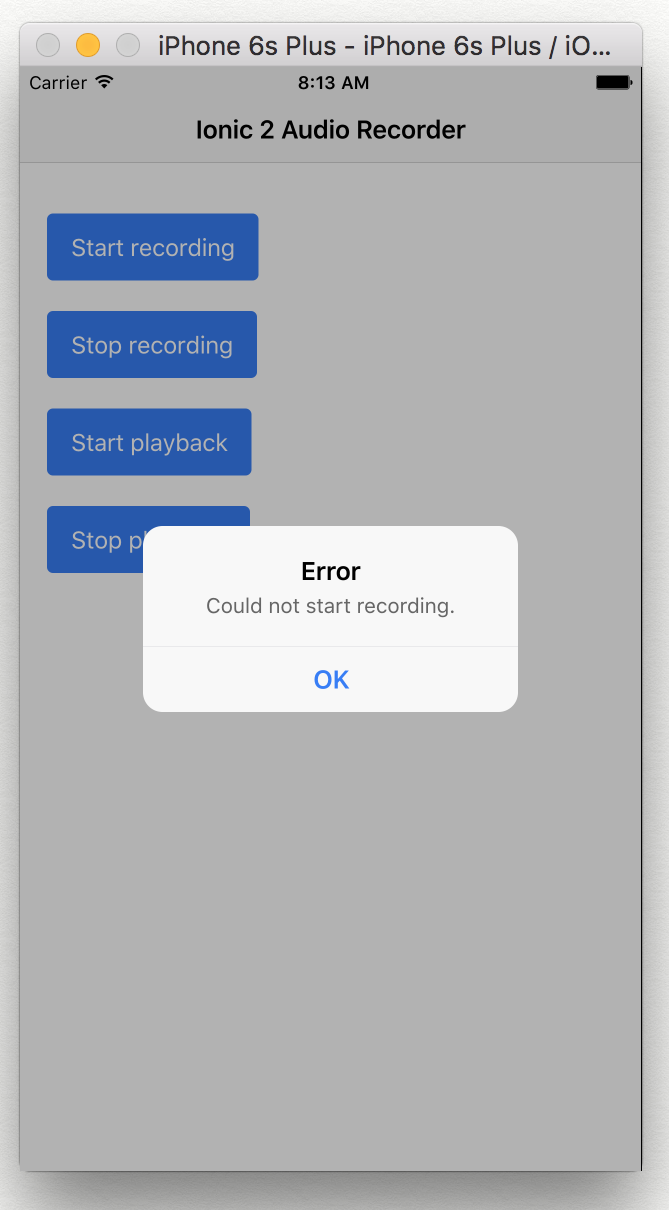
Moving the initialization to ionViewWillEnter also results in the same error, but moving it to ionViewDidEnter solves our problem:
This time, everything works (provided we click on the buttons in the right order). We can record and playback audio in our Ionic 2 app, using just a couple of lines of JavaScript code!
As a funny side note, the official iOS simulator documentation explicitly states that the microphone can’t be used in the simulator :)
Running in a specific simulator
Each time we ran our app in the simulator, it opened the default simulator. However, it is also possible to specify the simulator that should be used.
The first step is to get a list of all (iOS) simulator device types. We can do this with the following command:
ios-sim showdevicetypes
This will output a list of device types that can be used in the simulator:
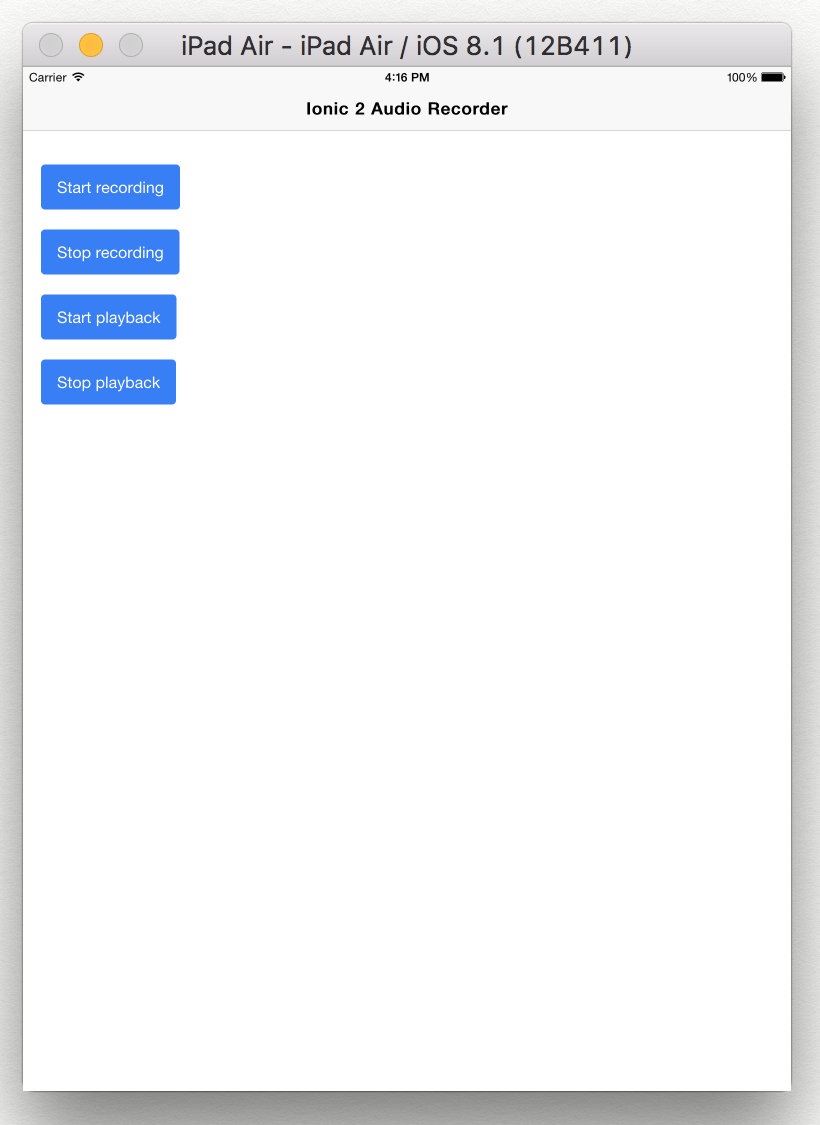
We then specify the device type we want to use through the --target parameter:
ionic emulate ios --target="iPad-Air, 8.1"
The emulator will now load our app in an iPad Air simulator running iOS 8.1:
Running on a device
Although running our app in a simulator is fine, the ultimate test would be to run our app on a physical device. As I want to run our app on my iPhone, I need to make sure our app supports the iOS platform. Luckily for us, we already allowed our app to run on iOS when we ran our app in the simulator.
After having connected our iPhone to our MacBook, we then run:
ionic run ios
This should run our app on our device, but even though my device is recognized, an error occurs:
After some Googling, I found that this problem can be fixed by appending --device:
ionic run ios --device
Similar to running our app on the simulator, our app is compiled to a native app:
After a short while, our app will be displayed on our phone (make sure to have your phone unlocked):
Clicking on the “Start recording” button now issues the following prompt:
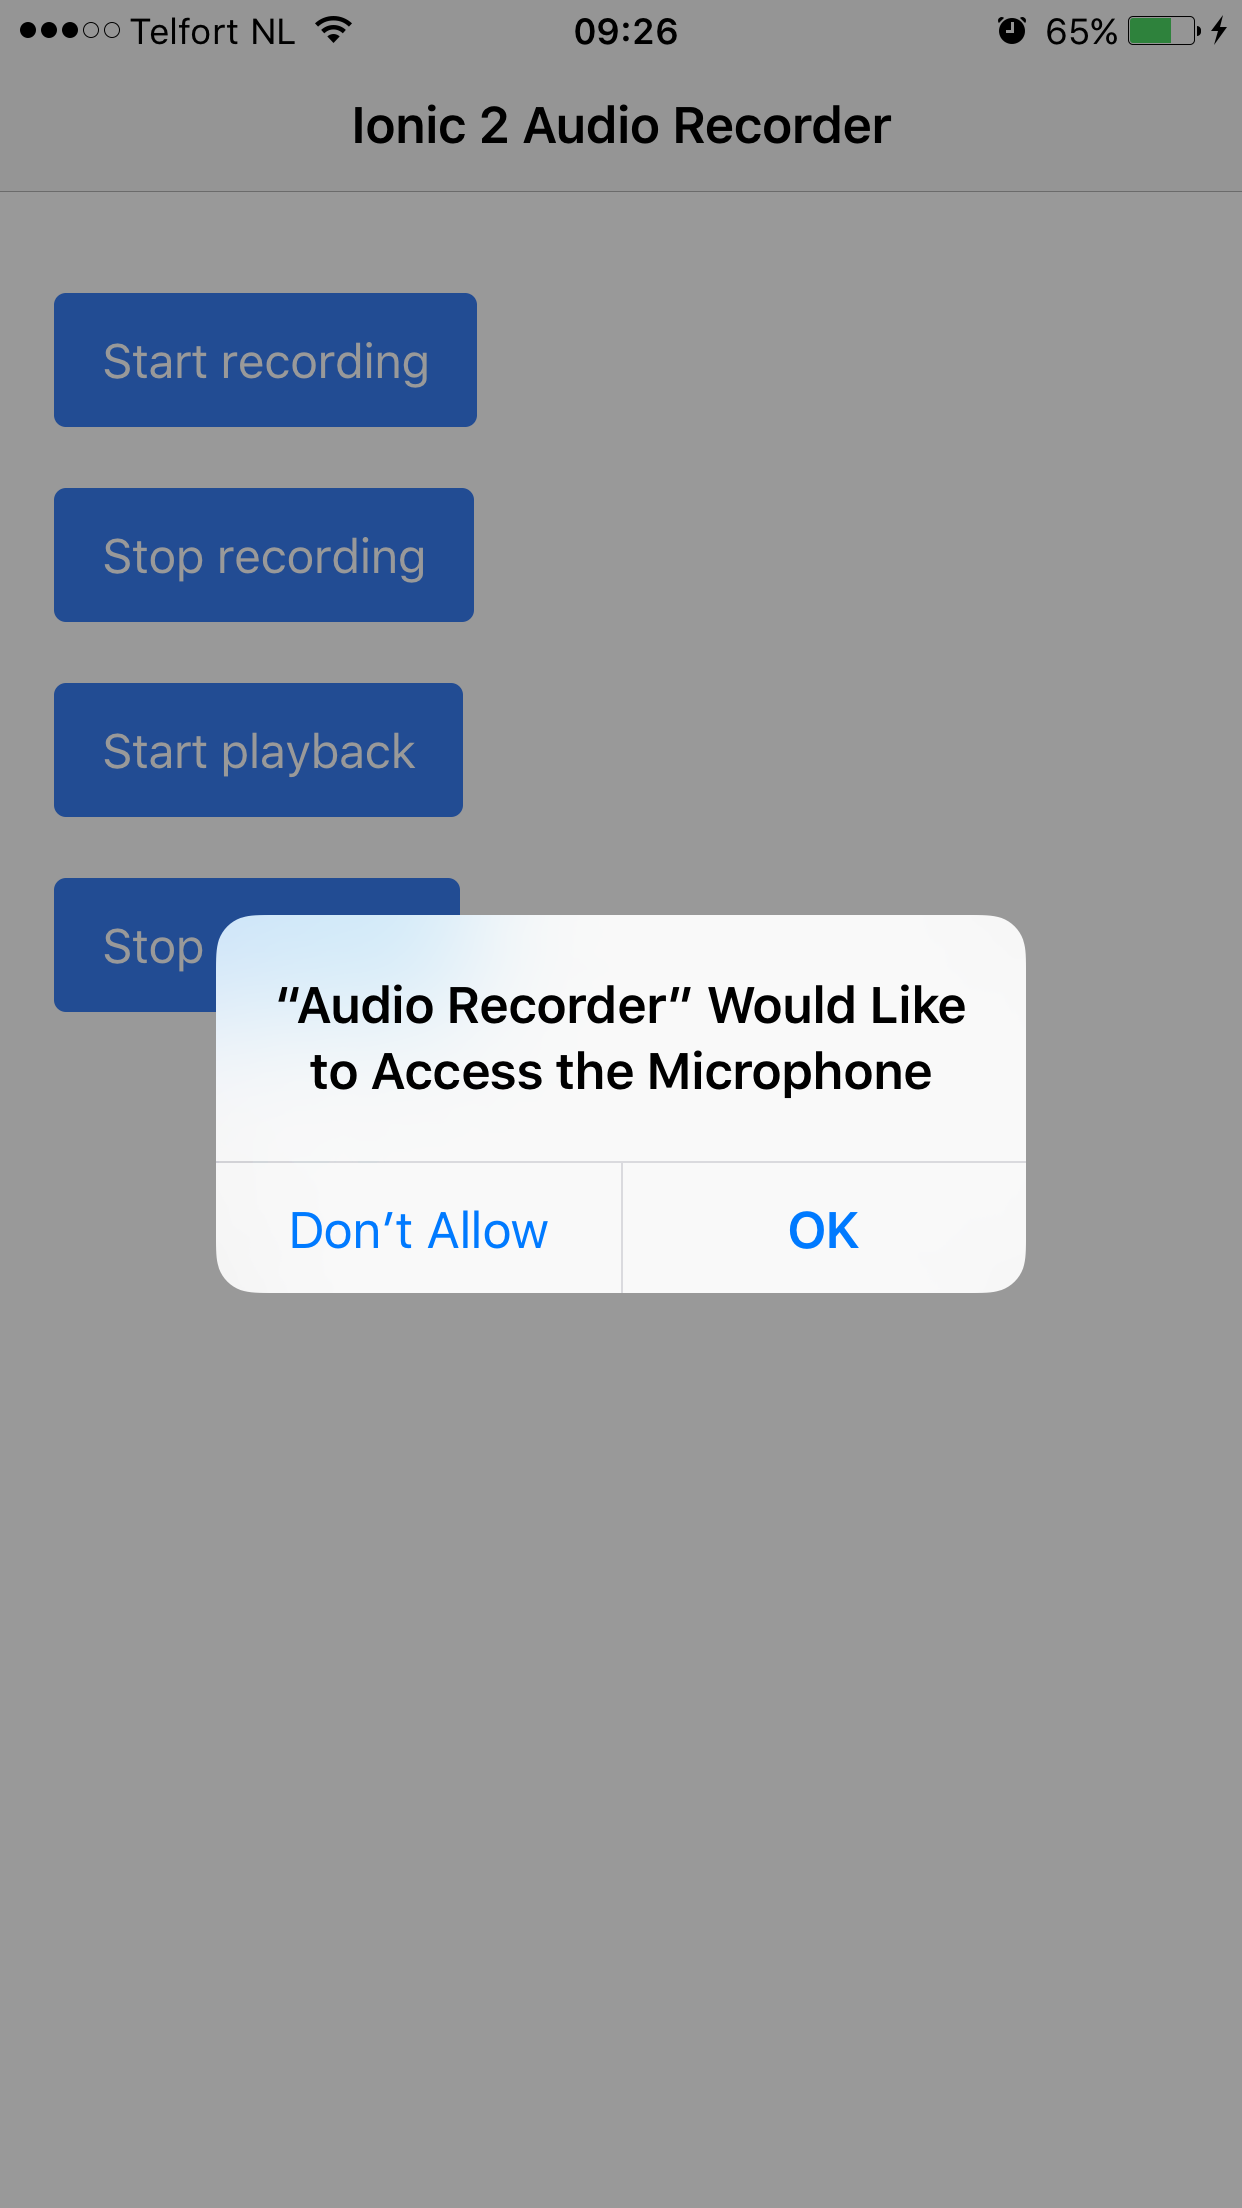
If we click “OK”, we can now verify that our app also works on an iPhone.
Running on a device using Ionic View
Besides viewing our app in a browser, simulator or on a device, there is a fourth option: the Ionic View app. With this option, you install the Ionic View app on your iOS or Android device, which you can then use to test your apps with.
To do so, simply run:
ionic upload
Its output will look like this:
To upload our app, we first had to login to our Ionic account. If you don’t have one, you can create one here. After signing in, the app is uploaded and can be accessed in the Ionic View app.
Before we’ll see what that looks like, notice that the build output also issued a warning:
This warning indicates that the upload Gulp task does not depend on any other task. If you want to be ensure that you’ll always upload the latest version of your app, you need to make sure that the upload task depends on the build task. Fixing this is easy, just add the following line to gulpfile.js:
gulp.task("upload:before", ["build"]);
Having uploaded our app, let’s open the Ionic View app to see what it looks like:
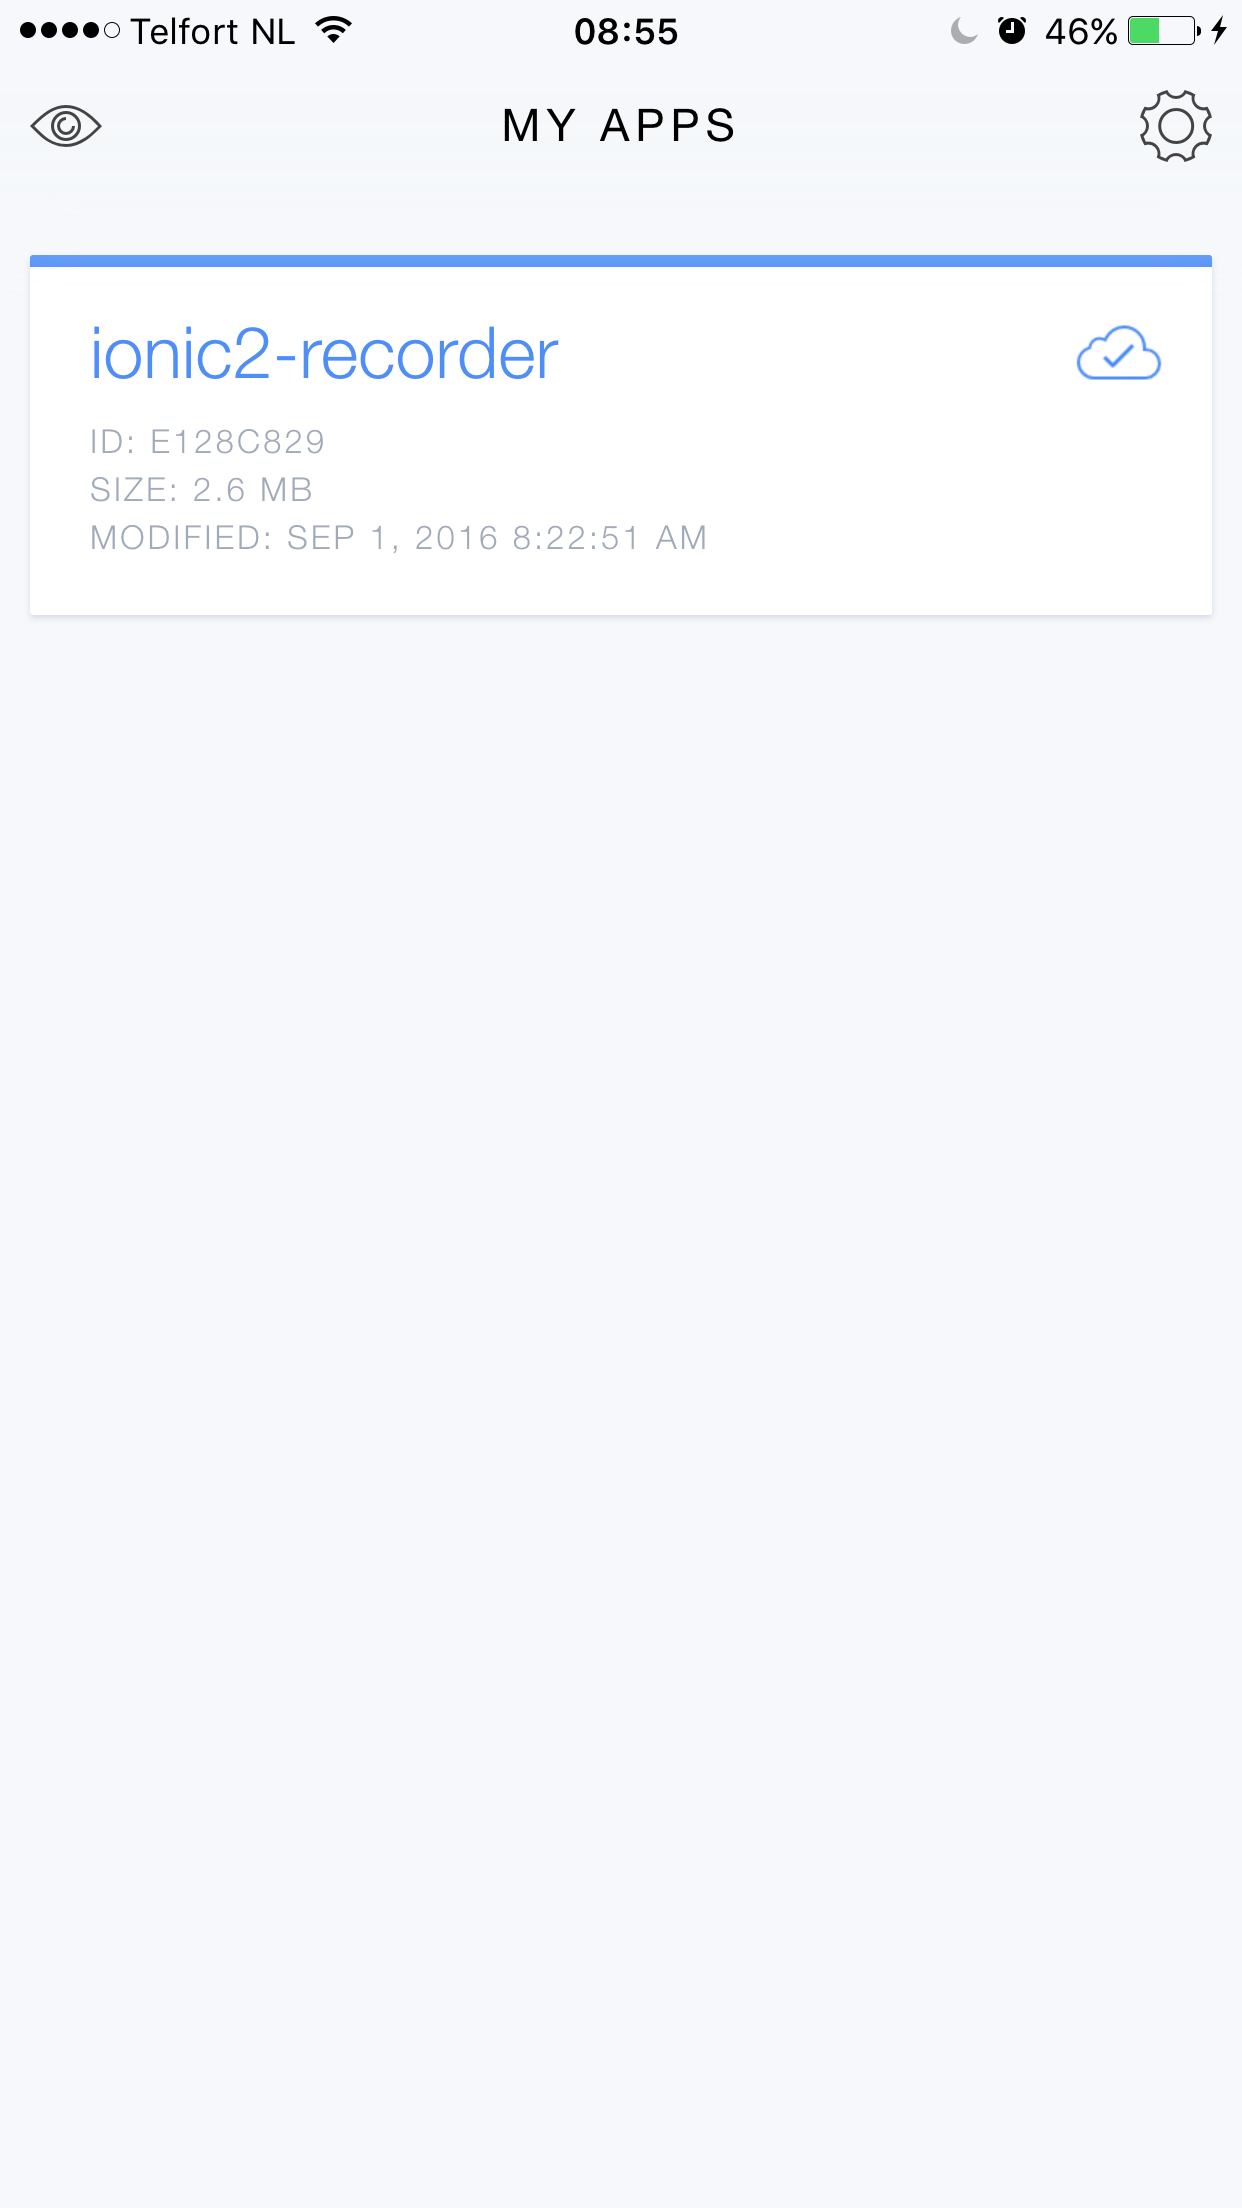
We can see that we have access to one app: the one we just uploaded. If we click on it, we get the following menu:
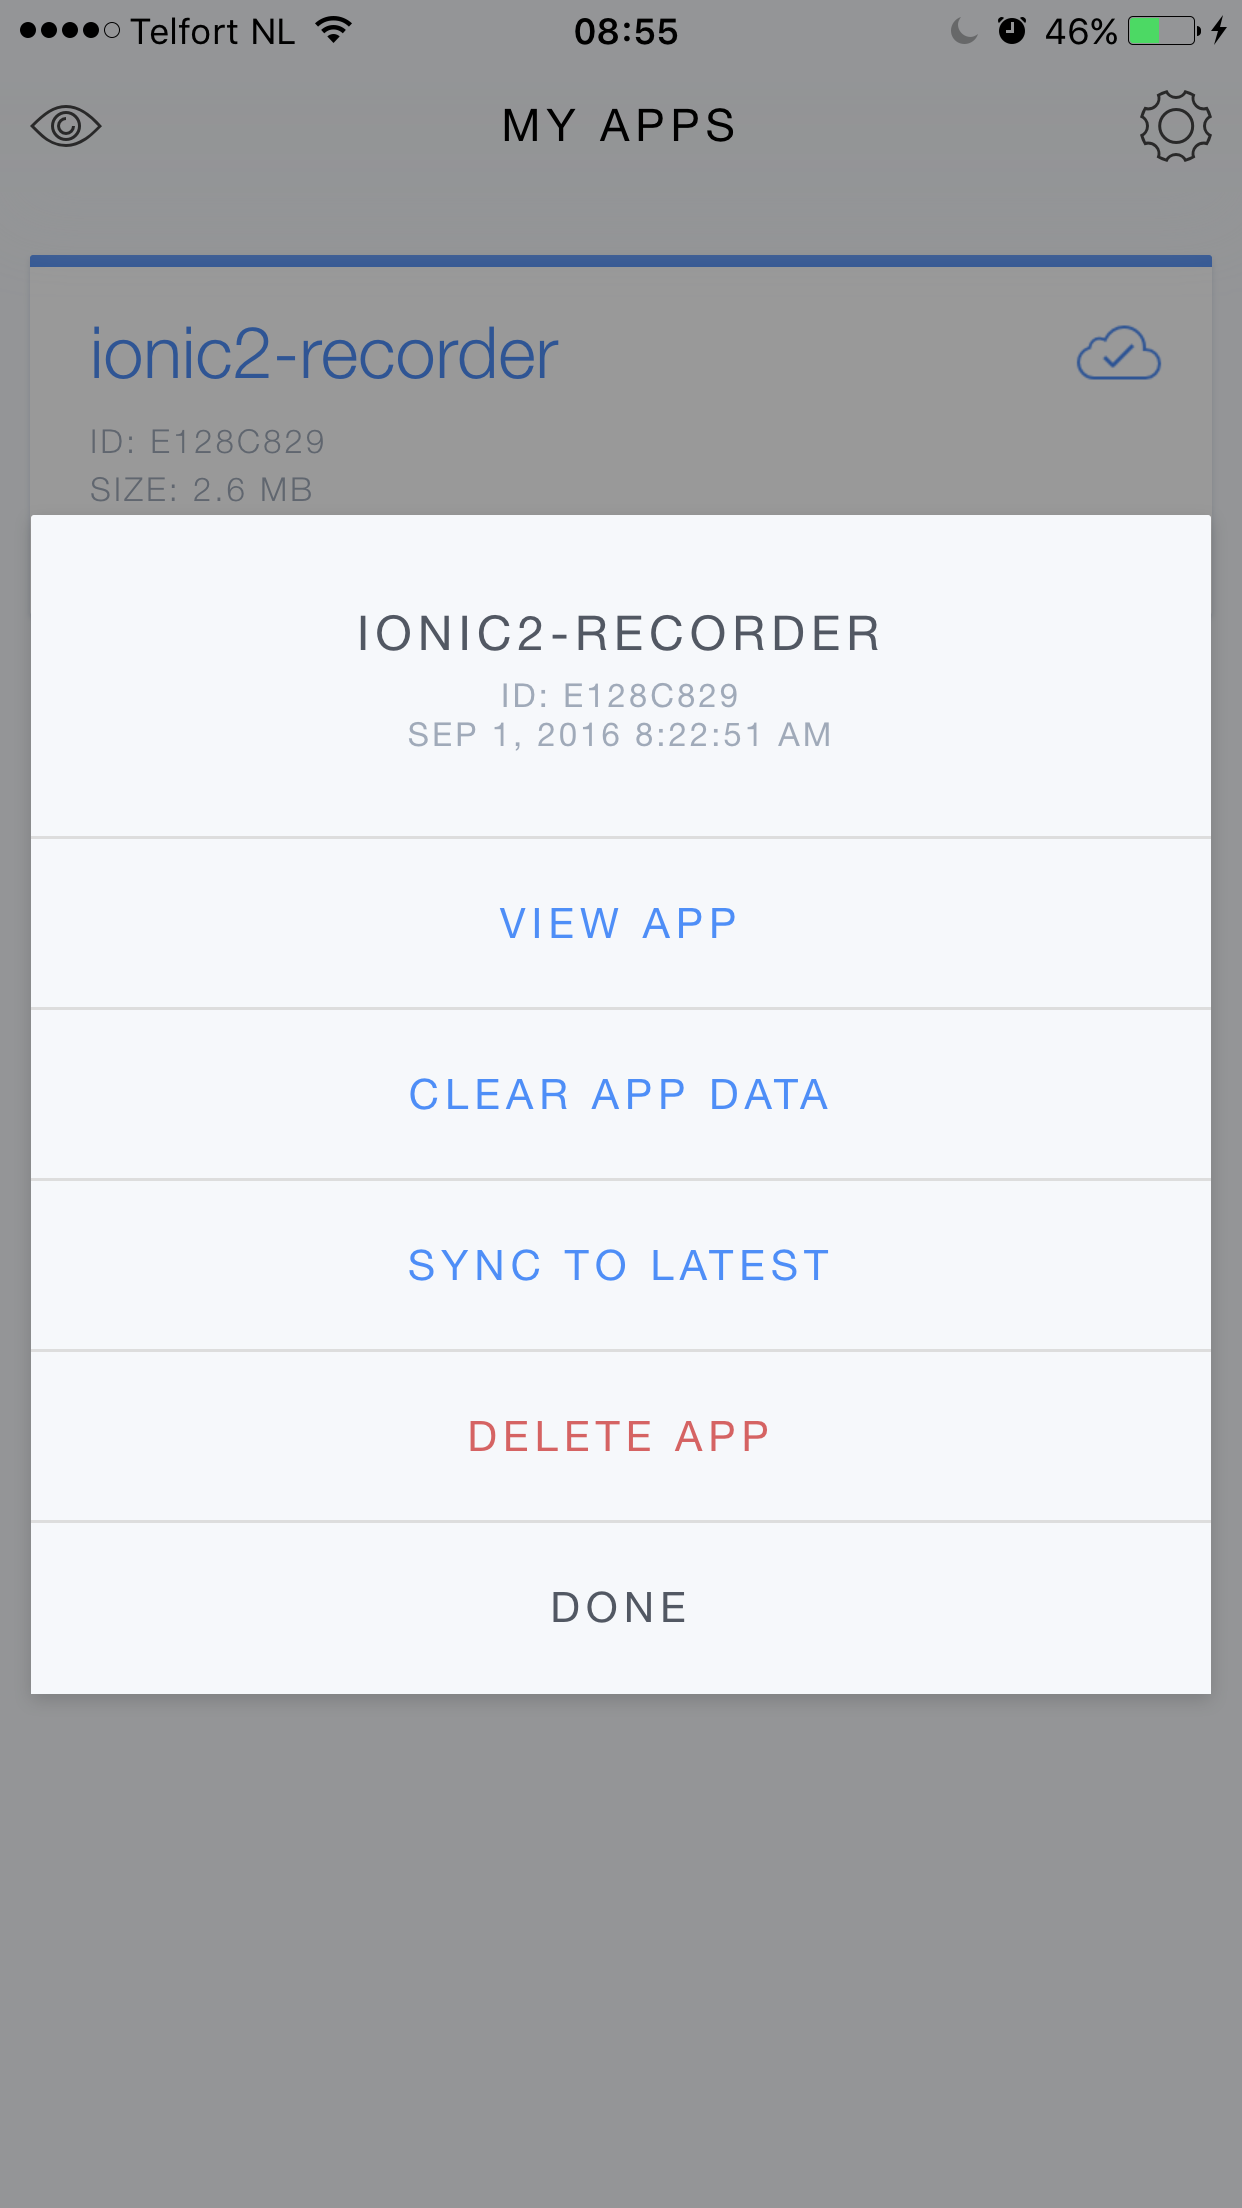
The available options are fairly straightforward. We’ll use the “View app” button to run our app:
As you can see, running the app from the Ionic View app looks identical to running the app directly on our device. Furthermore, as Ionic View is a native app with access to all native capabilities, our app still perfectly records audio.
Sharing with other people
Up until now, we tested our app ourselves. But what if we want other people to test our app? Well, simple! Just use the ionic share command:
ionic share coworker@test.com
So what does this command do? Let’s examine its output:
You can see that an email invite was sent to the specified email address. This email contains instructions on how to preview our app. In short, what the user must do is:
- Create an Ionic account.
- Install the Ionic View app.
- Follow the instructions in the email invite.
Having followed these three steps, the user will have access to our app from within their Ionic View app installation.
Note that the version of the app they will receive, will be the latest version that was uploaded through ionic upload.
Extracting the recording functionality
At the moment, the audio recording and playback functionality was added directly to the HomePage class. As a consequence, if we want to use the audio functionality somewhere else in our app, we’d have to either duplicate the code or extract the audio functionality into a separate class. Let’s try the second option.
First, we’ll create a services directory in our app directory. Within the services directory, create a TypeScript file named audiorecorder.ts, in which we’ll define an AudioRecorder class. Extracting the audio recording functionality from our HomePage class, we end up with the following class:
import { MediaPlugin } from "ionic-native";

export class AudioRecorder {
  media: MediaPlugin;

  constructor() {
    this.media = new MediaPlugin("../Library/NoCloud/recording.wav");
  }

  startRecording() {
    this.media.startRecord();
  }

  stopRecording() {
    this.media.stopRecord();
  }

  startPlayback() {
    this.media.play();
  }

  stopPlayback() {
    this.media.stop();
  }
}
Looks quite nice, agreed? There is another, obvious refactoring. The MediaPlugin instance only really needs to be created when it is first used, so let’s delay creating the MediaPlugin instance:
export class AudioRecorder {
  mediaPlugin: MediaPlugin = null;

  get MediaPlugin(): MediaPlugin {
    if (this.mediaPlugin == null) {
      this.mediaPlugin = new MediaPlugin("../Library/NoCloud/recording.wav");
    }

    return this.mediaPlugin;
  }

  startRecording() {
    this.MediaPlugin.startRecord();
  }

  stopRecording() {
    this.MediaPlugin.stopRecord();
  }

  startPlayback() {
    this.MediaPlugin.play();
  }

  stopPlayback() {
    this.MediaPlugin.stop();
  }
}
Finally, wouldn’t it be nice if we could inject this class, just like we did with the AlertController? Easy. We just import the Injectable decorator and decorate our class with it:
import { Injectable } from '@angular/core';

@Injectable()
export class AudioRecorder {
  ...
}
With all these changes, our HomePage class becomes a lot easier. First, we can replace the import of the MediaPlugin class with an import of our AudioRecorder class:
import { AudioRecorder } from "../../services/audiorecorder";
If you are wondering how we arrived at this relative import path, consider the current layout of the app directory:
You’ll see that after moving up two directories from the home.ts file, we are in the app directory. Then it’s into to the services directory and its audiorecorder.ts file (note that you should omit the file’s extension).
Next, we’ll add the AudioRecorder to the list of providers for our class (to ensure it can be injected) and add it as a parameter to our constructor:
@Component({
  templateUrl: 'build/pages/home/home.html',
  providers: [AudioRecorder]
})
export class HomePage {

  constructor(public navCtrl: NavController,
              public alertCtrl: AlertController,
              public audioRecorder: AudioRecorder) {
  }

  ...
}
Note that due to the lazy initialization of the MediaPlugin instance in the AudioRecorder class, we no longer have to defer creating the instance to the ionViewLoaded function.
Finally, we’ll update the audio handling functions to use our AudioRecorder instance:
startRecording() {
  try {
    this.audioRecorder.startRecording();
  }
  catch (e) {
    this.showAlert('Could not start recording.');
  }
}

stopRecording() {
  try {
    this.audioRecorder.stopRecording();
  }
  catch (e) {
    this.showAlert('Could not stop recording.');
  }
}

startPlayback() {
  try {
    this.audioRecorder.startPlayback();
  }
  catch (e) {
    this.showAlert('Could not play recording.');
  }
}

stopPlayback() {
  try {
    this.audioRecorder.stopPlayback();
  }
  catch (e) {
    this.showAlert('Could not stop playing recording.');
  }
}
If we test our refactored app, we’ll find it still works as expected, but our code now has much better separation of concerns.
Updating the user-interface
Although we can record audio in our app, the interface could use some refinement. For example, we should only allow people to click on the “Start playback” button once something has actually been recorded. Similarly, we shouldn’t allow people to stop recording when nothing is being recorded. The status of the buttons thus depends on the “state” of the audio recorder. We’ll model this by adding the following enum to the audiorecorder.ts file:
export enum AudioRecorderState {
    Ready,
    Recording,
    Recorded,
    Playing
}
We then add a RecordingState field to the AudioRecorder and update it in each function:
export class AudioRecorder {
  state: AudioRecorderState = AudioRecorderState.Ready;

  startRecording() {
    this.MediaPlugin.startRecord();
    this.state = AudioRecorderState.Recording;
  }

  stopRecording() {
    this.MediaPlugin.stopRecord();
    this.state = AudioRecorderState.Recorded;
  }

  startPlayback() {
    this.MediaPlugin.play();
    this.state = AudioRecorderState.Playing;
  }

  stopPlayback() {
    this.MediaPlugin.stop();
    this.state = AudioRecorderState.Ready;
  }

  ...
}
The last step is to dynamically enable and disable buttons depending on the audio recorder’s state. For that, we’ll modify the home.html file:
<p>
  <button
    (click)="startRecording()"
    [disabled]="audioRecorder.state != AudioRecorderState.Ready"
  >
    Start recording
  </button>
</p>
<p>
  <button
    (click)="stopRecording()"
    [disabled]="audioRecorder.state != AudioRecorderState.Recording"
  >
    Stop recording
  </button>
</p>
<p>
  <button
    (click)="startPlayback()"
    [disabled]="audioRecorder.state != AudioRecorderState.Recorded"
  >
    Start playback
  </button>
</p>
<p>
  <button
    (click)="stopPlayback()"
    [disabled]="audioRecorder.state != AudioRecorderState.Playing"
  >
    Stop playback
  </button>
</p>
Unfortunately, when we try to run our app, we get an error:
The problem is that our view doesn’t know about the AudioRecorderState enum. To fix this, we’ll also import the AudioRecorderState in our home.ts file:
import {
  AudioRecorder,
  AudioRecorderState,
} from "../../services/audiorecorder";
Then, we add it as a field to our HomePage class, which allows our view to access its values:
export class HomePage {
  AudioRecorderState = AudioRecorderState;

  ...
}
This time, things work as we expected them to:
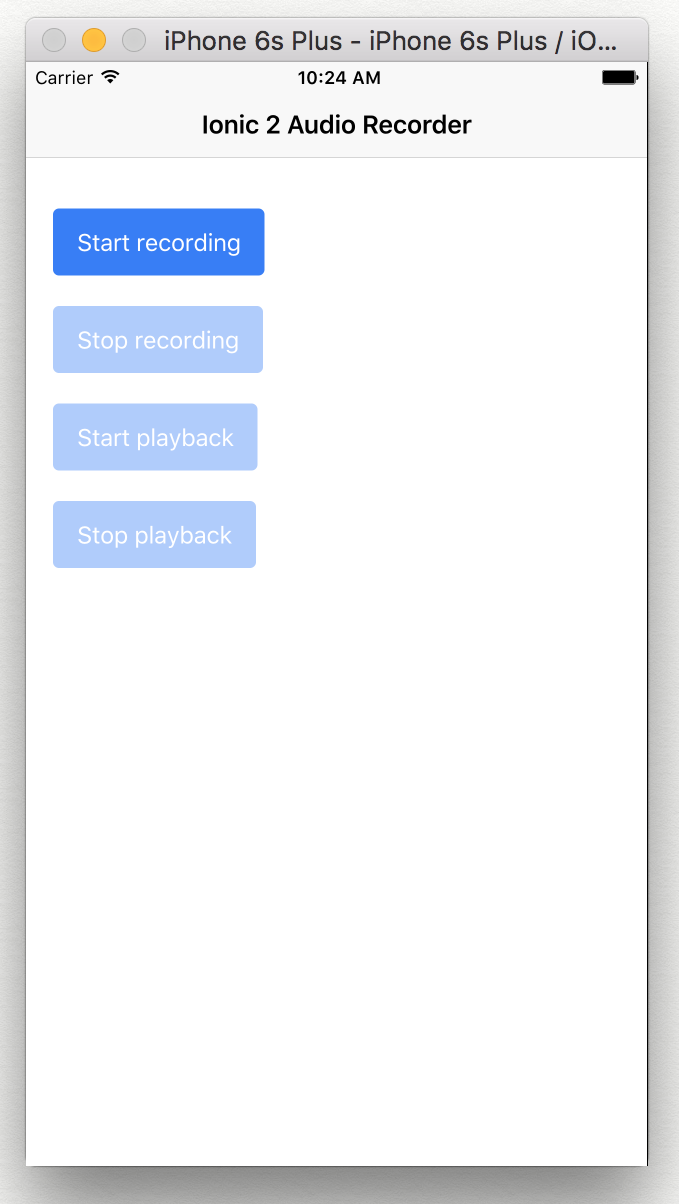
At first, only the “Start recording” button is enabled. Once we press that, only the “Stop recording” button is enabled, and so on.
Adding color and icons
The finishing touch is to give each button its own color and icon. Let’s start with the colors. First, we’ll add classes to our buttons in home.html:
<p>
  <button
    (click)="startRecording()"
    class="buttton-start-recording"
    [disabled]="audioRecorder.state != AudioRecorderState.Ready"
  >
    Start recording
  </button>
</p>
<p>
  <button
    (click)="stopRecording()"
    class="buttton-stop-recording"
    [disabled]="audioRecorder.state != AudioRecorderState.Recording"
  >
    Stop recording
  </button>
</p>
<p>
  <button
    (click)="startPlayback()"
    class="buttton-start-playback"
    [disabled]="audioRecorder.state != AudioRecorderState.Recorded"
  >
    Start playback
  </button>
</p>
<p>
  <button
    (click)="stopPlayback()"
    class="buttton-stop-playback"
    [disabled]="audioRecorder.state != AudioRecorderState.Playing"
  >
    Stop playback
  </button>
</p>
Next, we’ll create the styles for these newly added classes. We’ll do that in home.scss:
.buttton-start-recording,
.buttton-start-recording.activated {
  background-color: red;
}

.buttton-start-recording:hover:not(.disable-hover) {
  background-color: #ff6666;
}

.buttton-stop-recording,
.buttton-stop-recording.activated {
  background-color: orange;
}

.buttton-stop-recording:hover:not(.disable-hover) {
  background-color: #ffc966;
}

.buttton-start-playback,
.buttton-start-playback.activated {
  background-color: green;
}

.buttton-start-playback:hover:not(.disable-hover) {
  background-color: #80ff80;
}

.buttton-stop-playback,
.buttton-stop-playback.activated {
  background-color: blue;
}

.buttton-stop-playback:hover:not(.disable-hover) {
  background-color: #387ef5;
}
If we preview our app using these changes, the buttons will have different background colors:
Our final improvement is to add icons to the buttons. Adding an icon to our buttons is simple: just add an <ion-icon> component with the correct name attribute nested in the <button>:
<p>
  <button
    (click)="startRecording()"
    class="buttton-start-recording"
    [disabled]="audioRecorder.state != AudioRecorderState.Ready"
  >
    <ion-icon name="microphone"></ion-icon>
    Start recording
  </button>
</p>
<p>
  <button
    (click)="stopRecording()"
    class="buttton-stop-recording"
    [disabled]="audioRecorder.state != AudioRecorderState.Recording"
  >
    <ion-icon name="mic-off"></ion-icon>
    Stop recording
  </button>
</p>
<p>
  <button
    (click)="startPlayback()"
    class="buttton-start-playback"
    [disabled]="audioRecorder.state != AudioRecorderState.Recorded"
  >
    <ion-icon name="play"></ion-icon>
    Start playback
  </button>
</p>
<p>
  <button
    (click)="stopPlayback()"
    class="buttton-stop-playback"
    [disabled]="audioRecorder.state != AudioRecorderState.Playing"
  >
    <ion-icon name="square"></ion-icon>
    Stop playback
  </button>
</p>
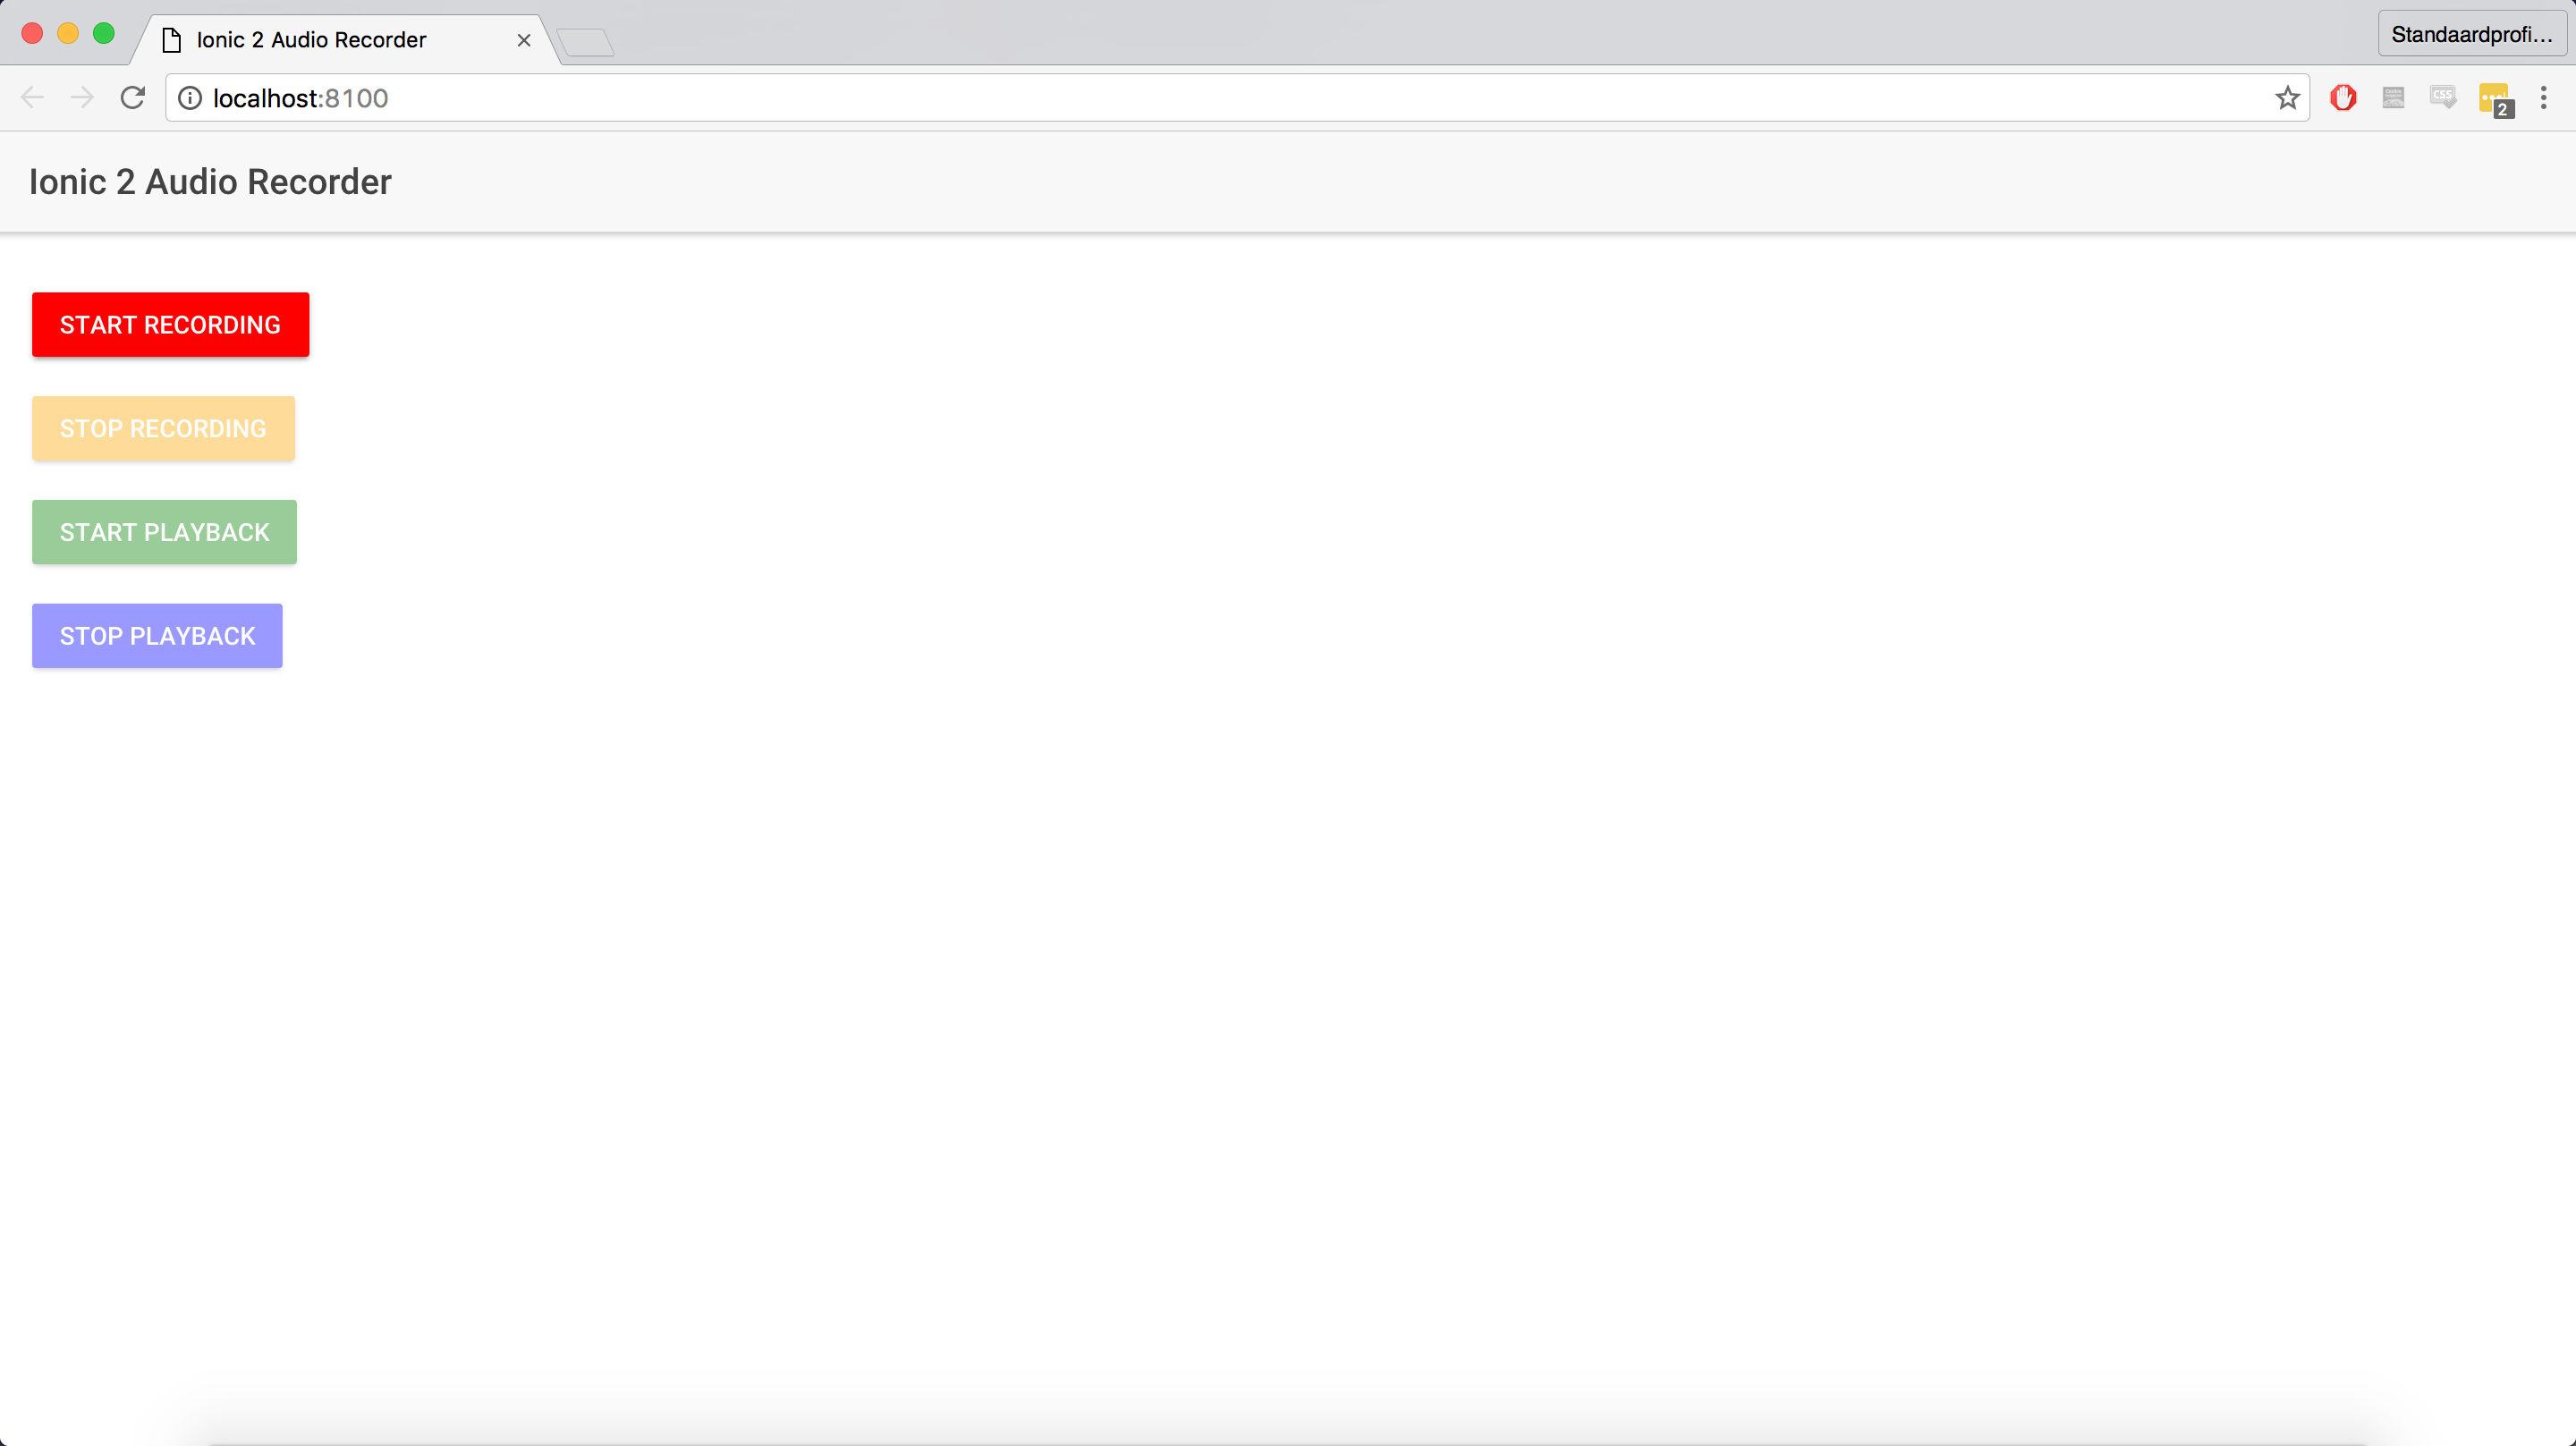
Let’s preview these changes using the multi-platform preview mode:
![]()
Looks much better, right? Those of you with a keen eye may have noticed that some icons will look different between platforms, which Ionic does automatically to better match each platform’s look-and-feel.
Source code
If you’d like to test the application yourself, the full source code can be found in my ionic2-audio-recorder repository.
Conclusion
Building native apps can be frustrating due to the lack of code sharing between the various platforms. With Ionic 2, you can build native mobile apps for multiple platforms from a single code base, using just HTML, JavaScript and CSS. This makes building an app quite similar to building a regular website.
Building our audio recorder app using Ionic 2 app turned out to be quite easy. Using just HTML and Ionic’s custom components, we created an app that looks like a proper native app. Even building the audio recording code was not very hard, due to Ionic Native giving us an easy to use API to handle audio with.
With helpful tools such as the Ionic CLI, a browser preview mode and the Ionic View app, building and sharing mobile apps has never been as easy or fun!